First deployment with Ansible
В этом руководстве описано, как впервые быстро развернуть Tarantool Data Grid (TDG) с помощью Ansible. Здесь приведен вариант развертывания TDG на двух виртуальных машинах с заданной конфигурацией.
Getting a TGZ file for deployment
To deploy Tarantool Data Grid, you need an RPM (.rpm), TGZ (tar.gz), or Docker image (docker-image.tar.gz) file. For deployment with Ansible, you can only use either an RPM or a TGZ file. For now, a TGZ file will do just fine. It is easier to deploy and does not require root access.
Download a TGZ file of the latest version at the customer zone of tarantool.io. Make sure your browser did not unarchive the downloaded file: the file extension should be tar.gz.
If you do not have access to the customer zone, contact us using the form on this page or write to sales@tarantool.io.
Setting up virtual machines
Чтобы развернуть TDG, вам нужно запустить две виртуальные машины с ОС Linux (желательно CentOS 7/RHEL 7) и доступом по SSH. Если у вас уже установлены приведенные ниже или альтернативные виртуальные машины, то пропустите эту главу. Если нет, то следуйте инструкции.
Установите VirtualBox для запуска виртуальных машин и Vagrant для автоматизации процесса конфигурации. Vagrant подготовит конфигурацию двух виртуальных машин с дополнительными сценариями для развертывания TDG.
Note
Перед установкой программного обеспечения проверьте, что разработчик не накладывает ограничений на использование — например, не ставит блокировки по IP-адресам. При возникновении проблем воспользуйтесь услугами альтернативных провайдеров виртуальных машин.
Make sure you have VBoxManage in your $PATH environment variable.
Check with the command:
$ which VBoxManage
In the downloaded TGZ file, there is a directory called deploy. There you’ll find Vagrantfile, which automates the creation of a test environment for cluster deployment.
Open the terminal, unpack the tar.gz archive, go to the deploy directory, and run virtual machines:
tar xzf tdg-<VERSION>.tar.gz # change <VERSION> for the TDG version you've downloaded
cd tdg2/deploy
vagrant up
This command will bring up two virtual machines with CentOS 7 and passwordless SSH access for user vagrant. IP addresses of those machines are: 172.19.0.2 and 172.19.0.3.
Deploying the cluster
Preparing
After you’ve created virtual machines, install locally Ansible and Tarantool Cartridge Ansible role (the latest 1.x version). If Ansible role version 2.x is available, you can choose it instead, but you may face some challenges.
Here is one of the ways to install Ansible and Ansible role:
pip install ansible~=4.1.0 # version 4.1 or later, but not version 5.x
ansible-galaxy install tarantool.cartridge,1.10.0
Configuring
In the deploy directory, there is the hosts.yml file. It contains cluster configuration.
Open it to set cluster cookie and path to package:
all
  vars:
    # cartridge_package_path: "../../packages/tdg-ENTER-VERSION-HERE.tgz" # path relative to playbook
    # cartridge_cluster_cookie: "ENTER-SECRET-COOKIE-HERE" # change for "secret-cookie"
Удалите #, чтобы раскомментировать эти строки, укажите версию TDG, которую вы скачали, и путь к TGZ-файлу. Также задайте cookie для кластера. Это должна быть уникальная строка, но для практики достаточно указать “secret-cookie”.
Here is an example:
all
  vars:
    cartridge_package_path: "../tdg-2.0.0-1132-g2358e716.tgz"
    cartridge_cluster_cookie: "secret-cookie"
If you need to, you can always edit this file to change cluster configuration. Here is some info about file sections:
all.vars— для общих переменных;all.children.tdg_group.hostsfor instances parametersall.children.tdg_group.childrento specify parameters for a group of instances:to group the instances by the host, set their
ansible_hostparameterto group the instances by replica set, set their
replicaset_alias,roles,failover_priorityparameters, and so on.
You can find more information about parameters in Tarantool Cartridge Ansible role documentation.
Deploying
В директории deploy находятся
Ansible-плейбуки,
которые помогут вам завершить развертывание. Есть два способа развернуть TDG с помощью плейбуков:
кластер TDG с полностью сконфигурированной топологией;
кластер TDG со списком экземпляров (инстансов, instances) без заданной конфигурации.
Чтобы полностью развернуть TDG с топологией, выполните эту команду:
$ ansible-playbook -i hosts.yml playbooks/deploy.yml
If you want to practice configuring the topology of the cluster via the web interface, run the playbook to deploy only instances:
$ ansible-playbook -i hosts.yml playbooks/deploy_without_topology.yml
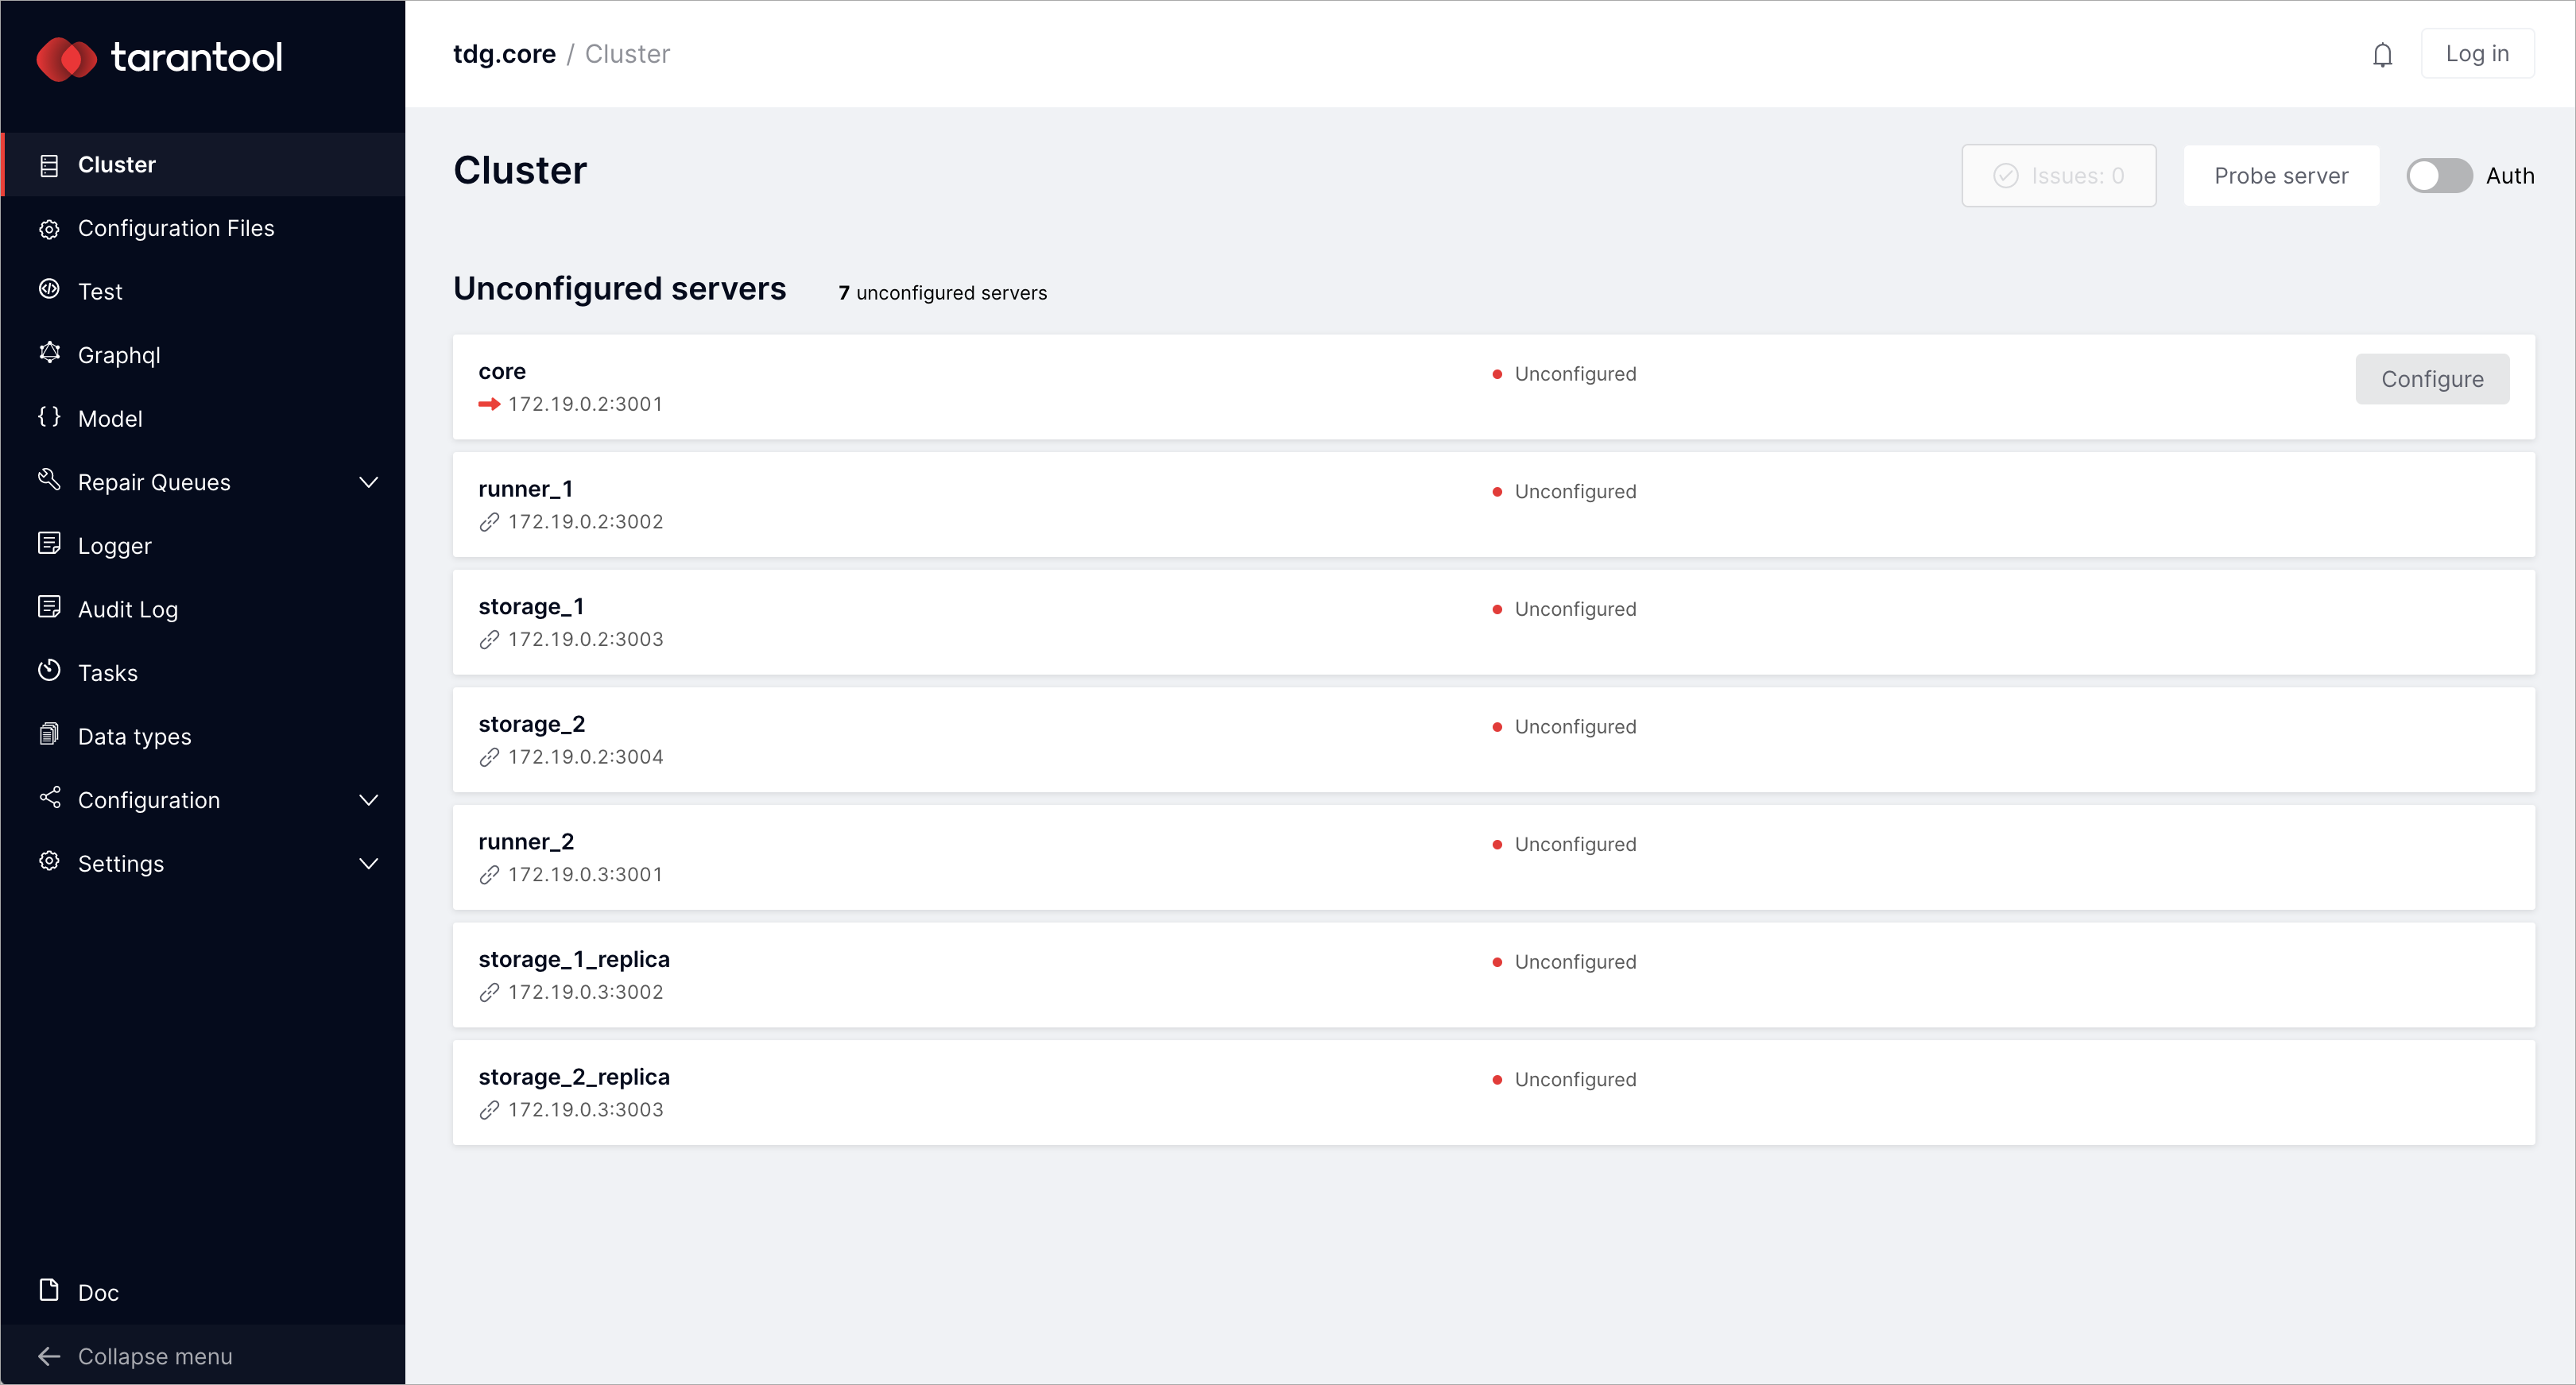
Now you can open http://172.19.0.2:8081 in your web browser to see the cluster web interface. This is what you’ll see if you chose to deploy without topology:
Managing the cluster
Configuring topology of the cluster
If you have deployed instances with topology, skip this topic.
If you have deployed instances without topology, you can now edit topology by creating replica sets and specifying their parameters in the web interface:
On the Cluster tab, there is a set of unconfigured instances. Select the core instance with the
172.19.0.2:3001URL and click Configure. You will get the Configure server dialog: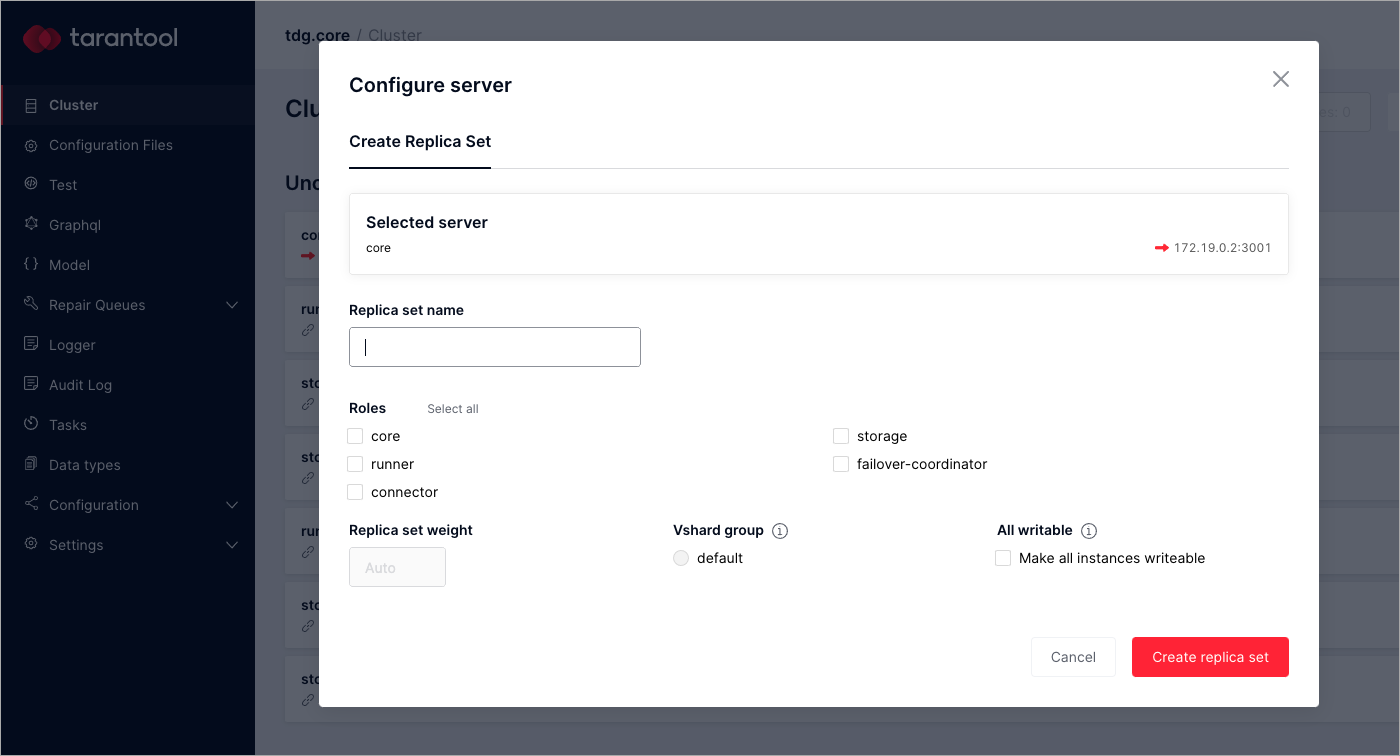
In the Configure server dialog, specify two replica set parameters: replica set name and role.
For the core instance, give the replica set name “core” and select the “core” role. After you’ve set the parameters, click Create replica set.
Set the same parameters for the rest of the unconfigured instances as follows:
Instance URL
Replica set name
Roles
172.19.0.2:3002
runner_1
runner, connector, failover-coordinator
172.19.0.2:3003
storage_1
storage
172.19.0.2:3004
storage_2
storage
172.19.0.3:3001
runner_2
runner, connector
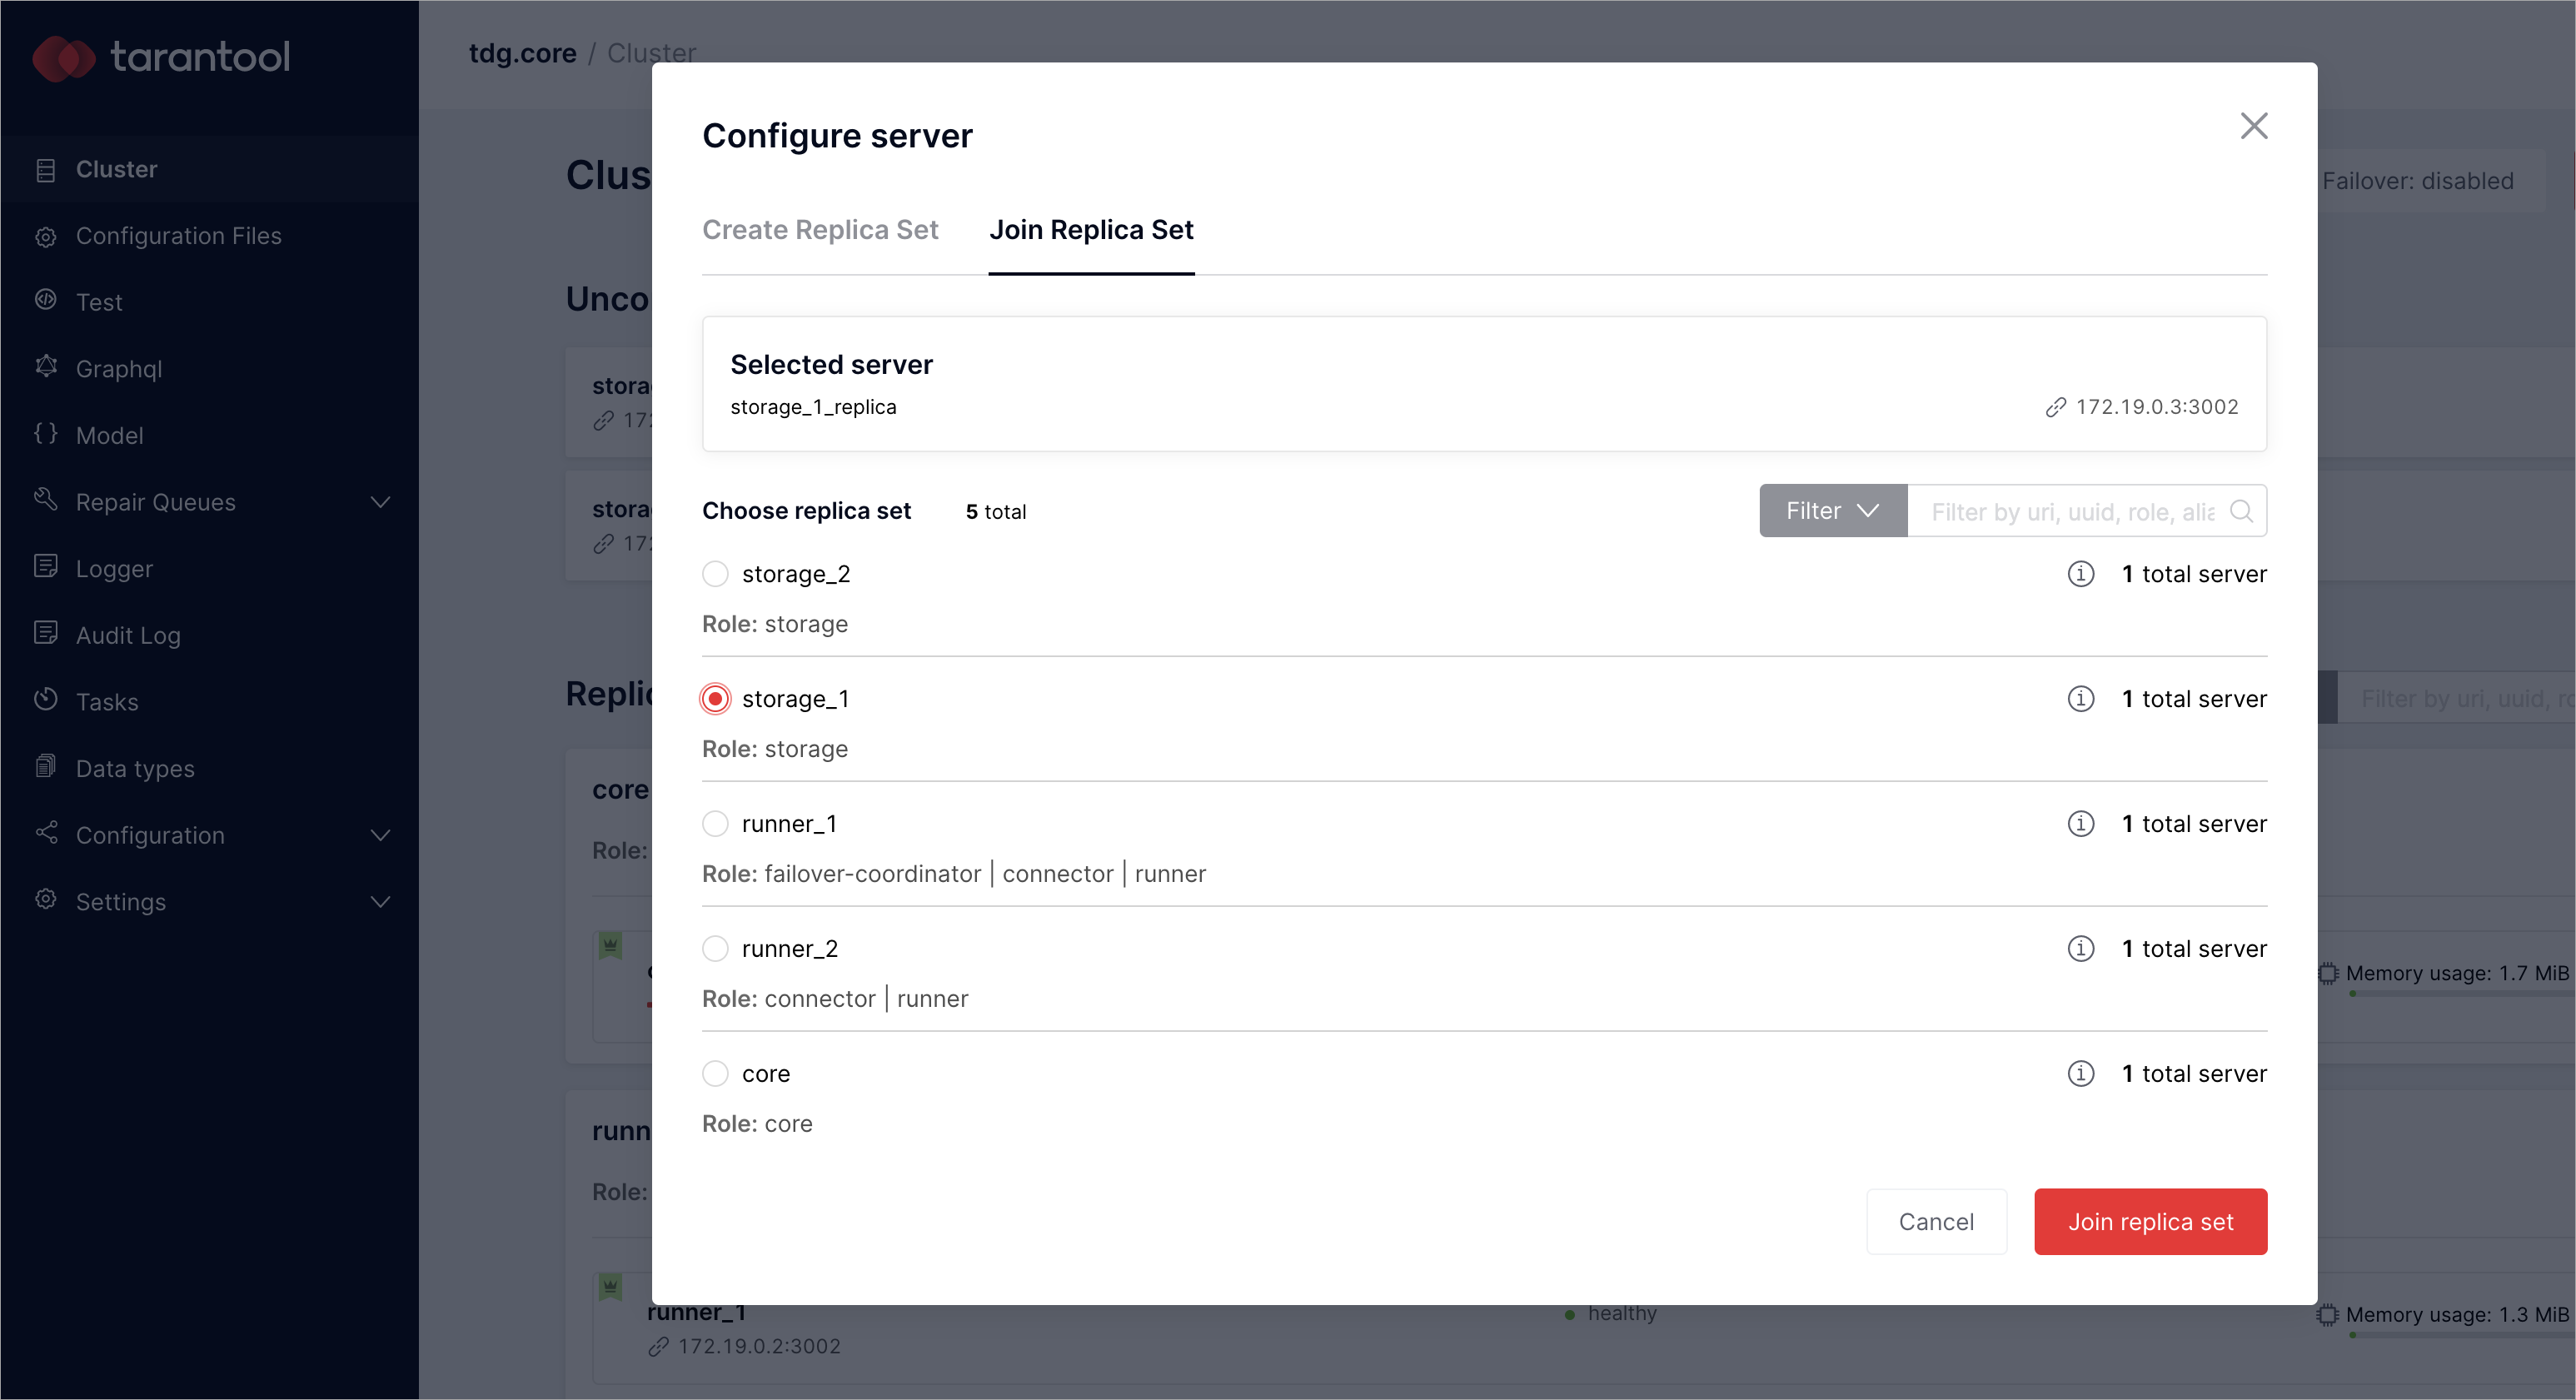
There are two instances left to configure, storage_1_replica with the
172.19.0.3:3002URL and storage_2_replica with the172.19.0.3:3003URL.Join them to the already existing replica sets with storage roles:
Select storage_1_replica and click Configure.
In the Configure server dialog, switch to the tab called Join Replica Set.
Check storage_1 and click Join replica set.
For storage_2_replica, repeat the same steps, but check storage_2 instead.
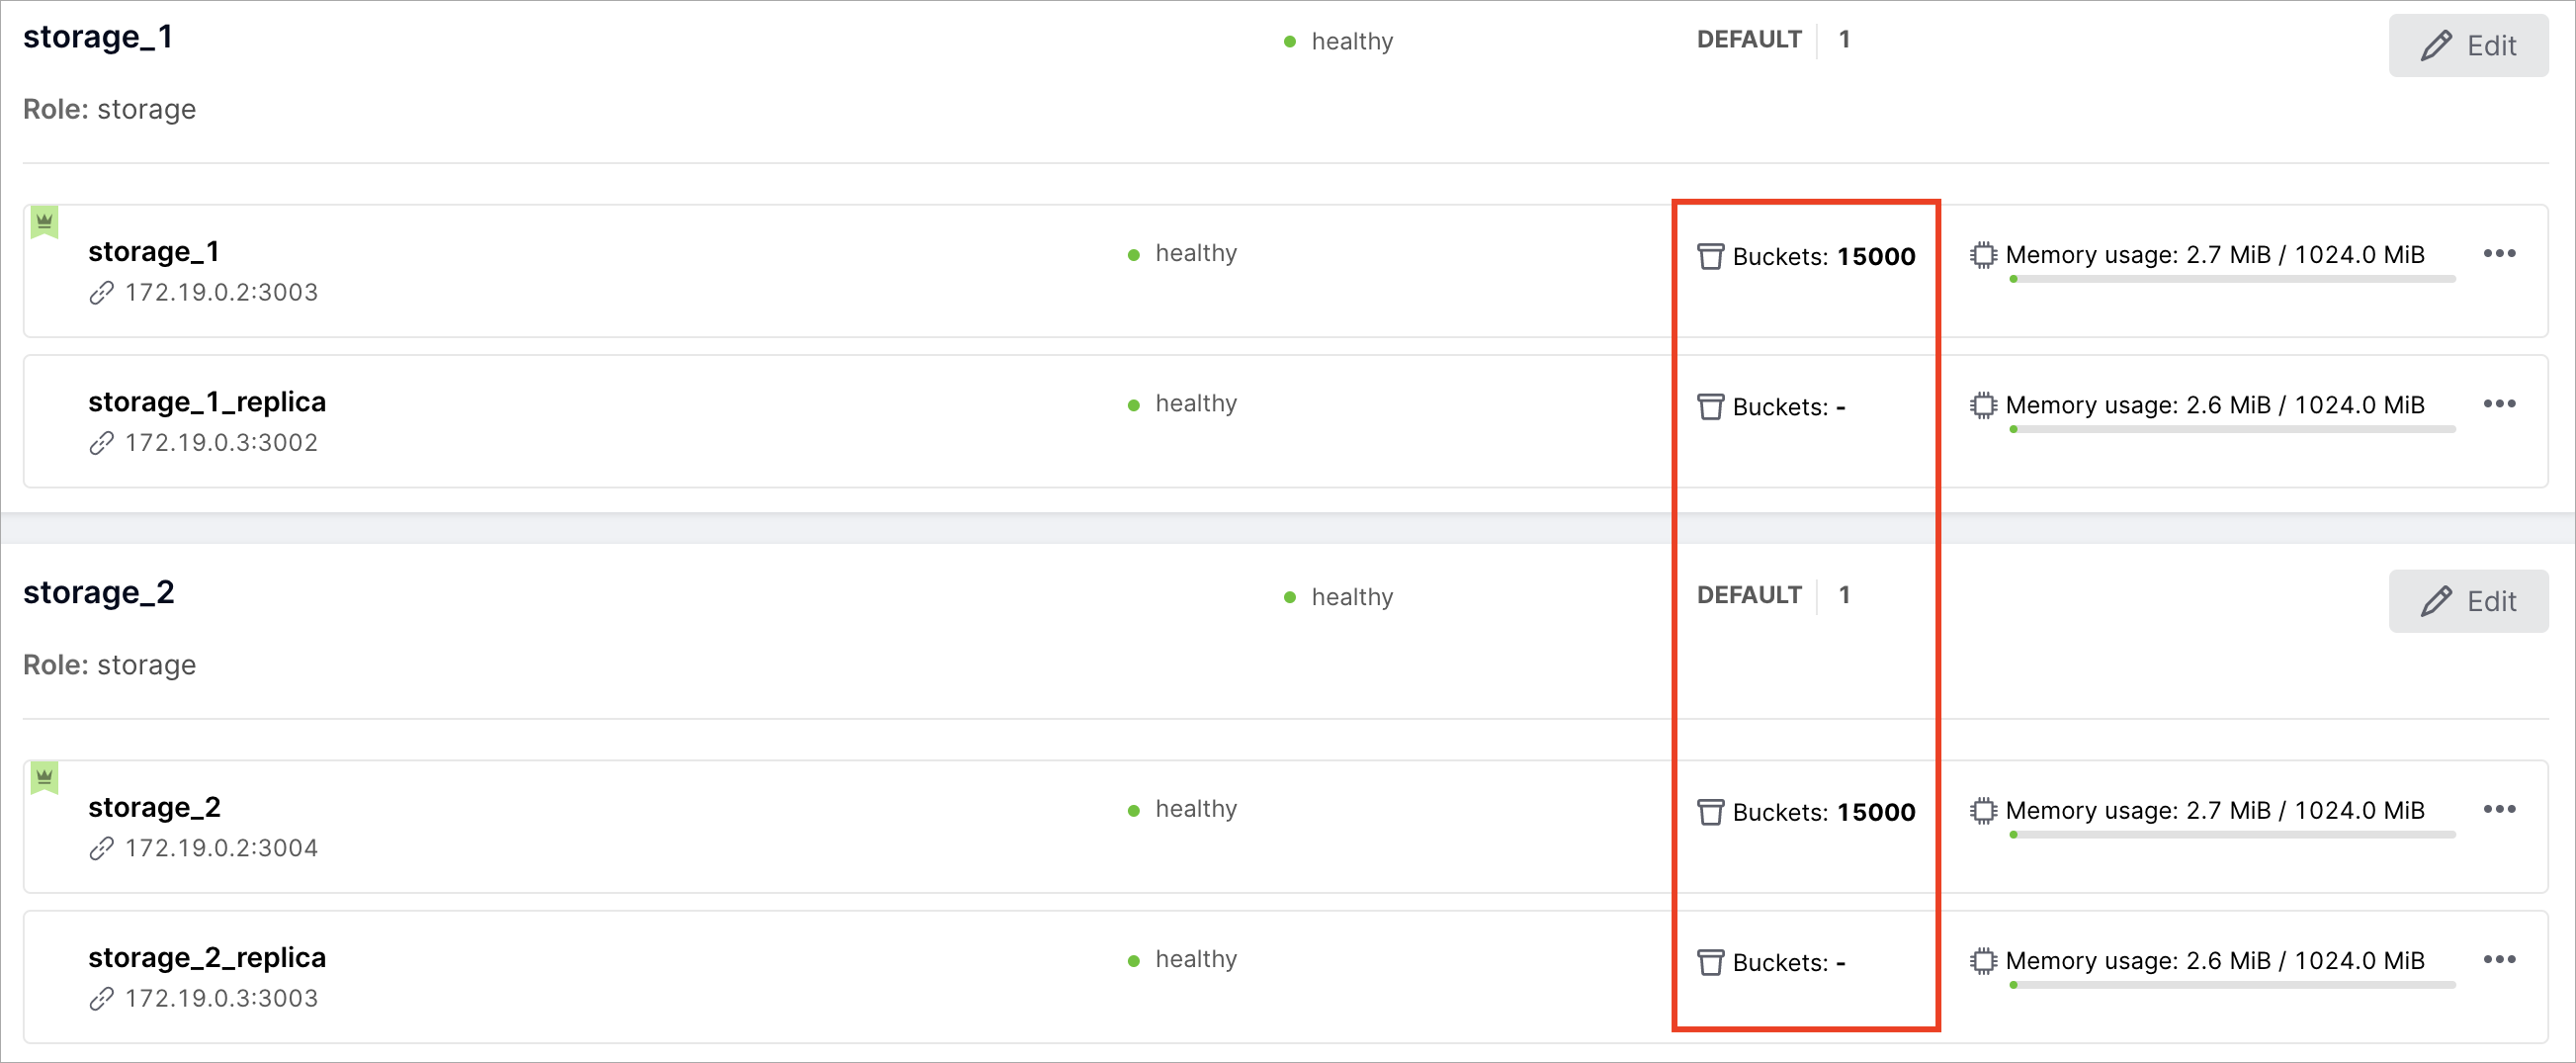
После того, как вы назначите все роли, нажмите “Bootstrap vshard”, чтобы
“включить наборы реплик storage. Это инициализирует модуль Tarantool
vshard. Подробнее об этом модуле можно узнать
в документации по Tarantool.
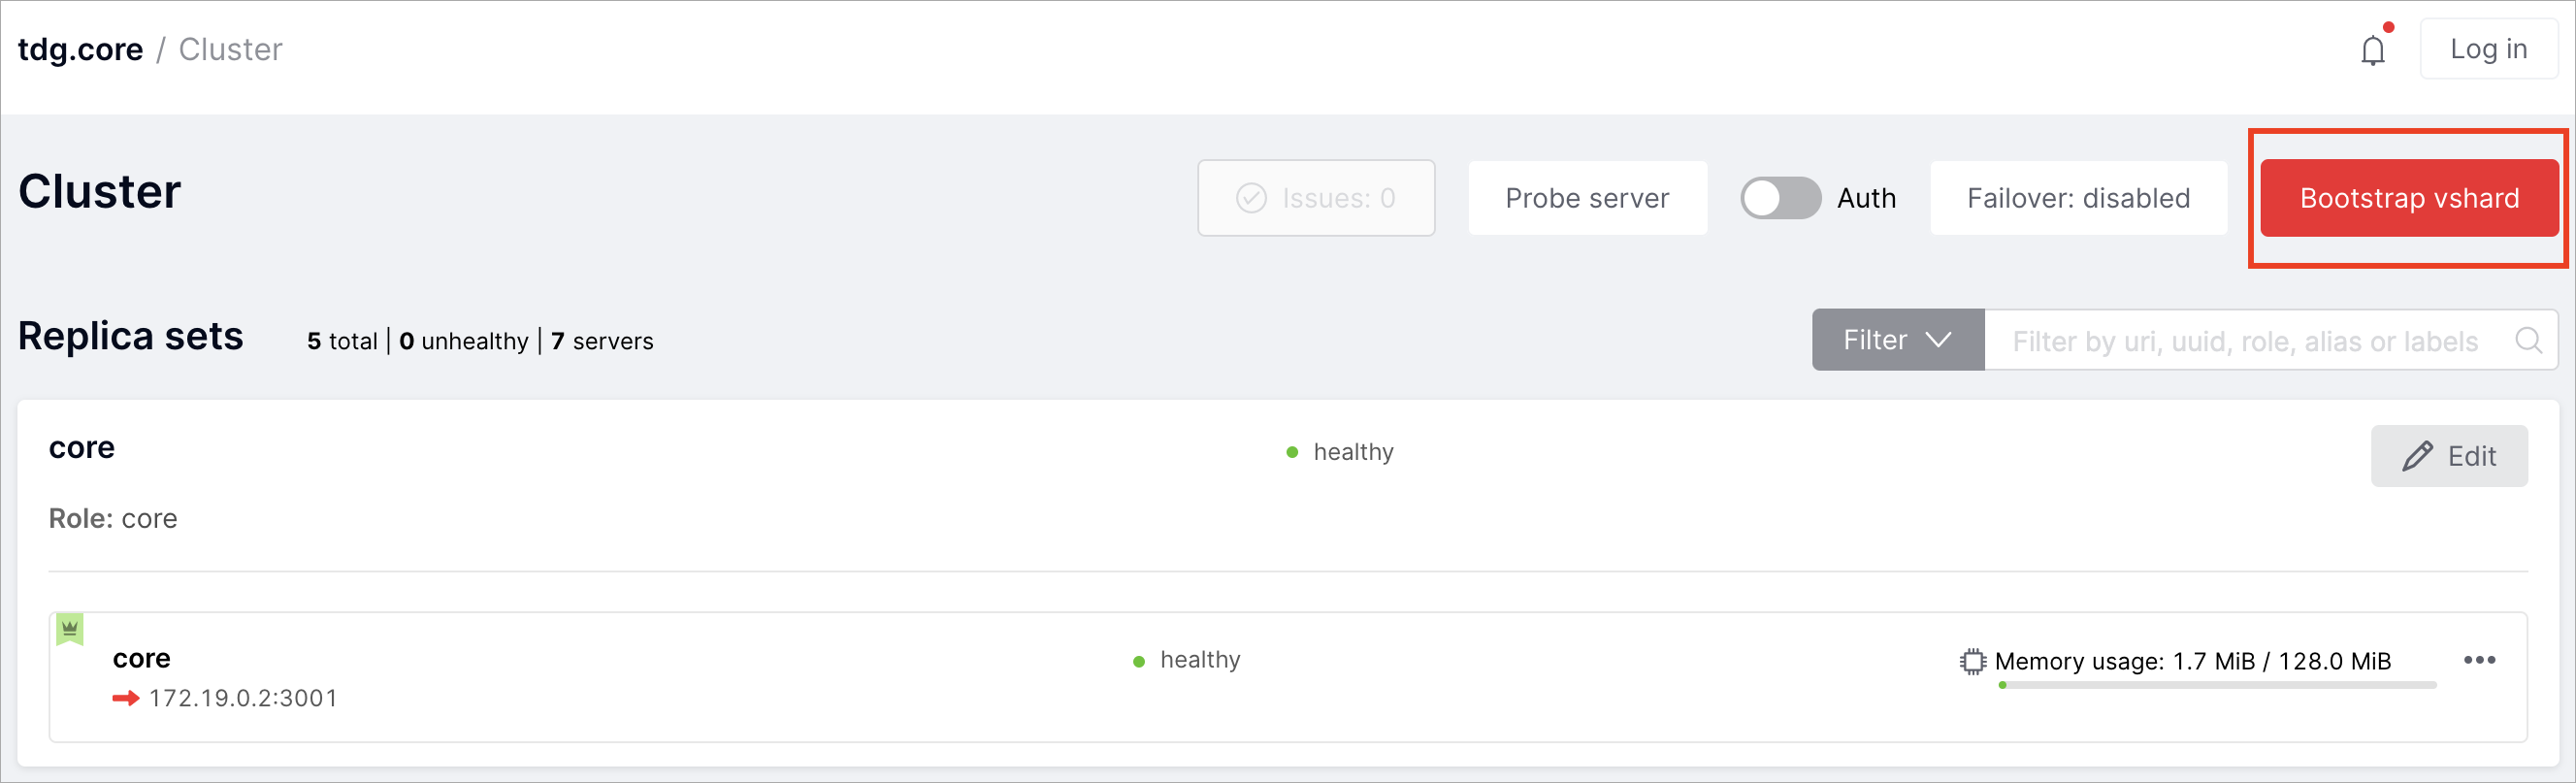
You’ve created virtual buckets that are allocated to storages according to the number of instances with the storage role.
Starting or stopping instances
This step is optional.
In the deploy directory, there are also playbooks that start or stop the instances. You can stop and disable all instances by stop.yml playbook:
$ ansible-playbook -i hosts.yml playbooks/stop.yml
You can start and enable all instances by start.yml playbook:
$ ansible-playbook -i hosts.yml playbooks/start.yml