

Creating a sharded cluster
Example on GitHub: sharded_cluster_crud
In this tutorial, you get a sharded cluster up and running on your local machine and learn how to manage the cluster using the tt utility. This cluster uses the following external modules:
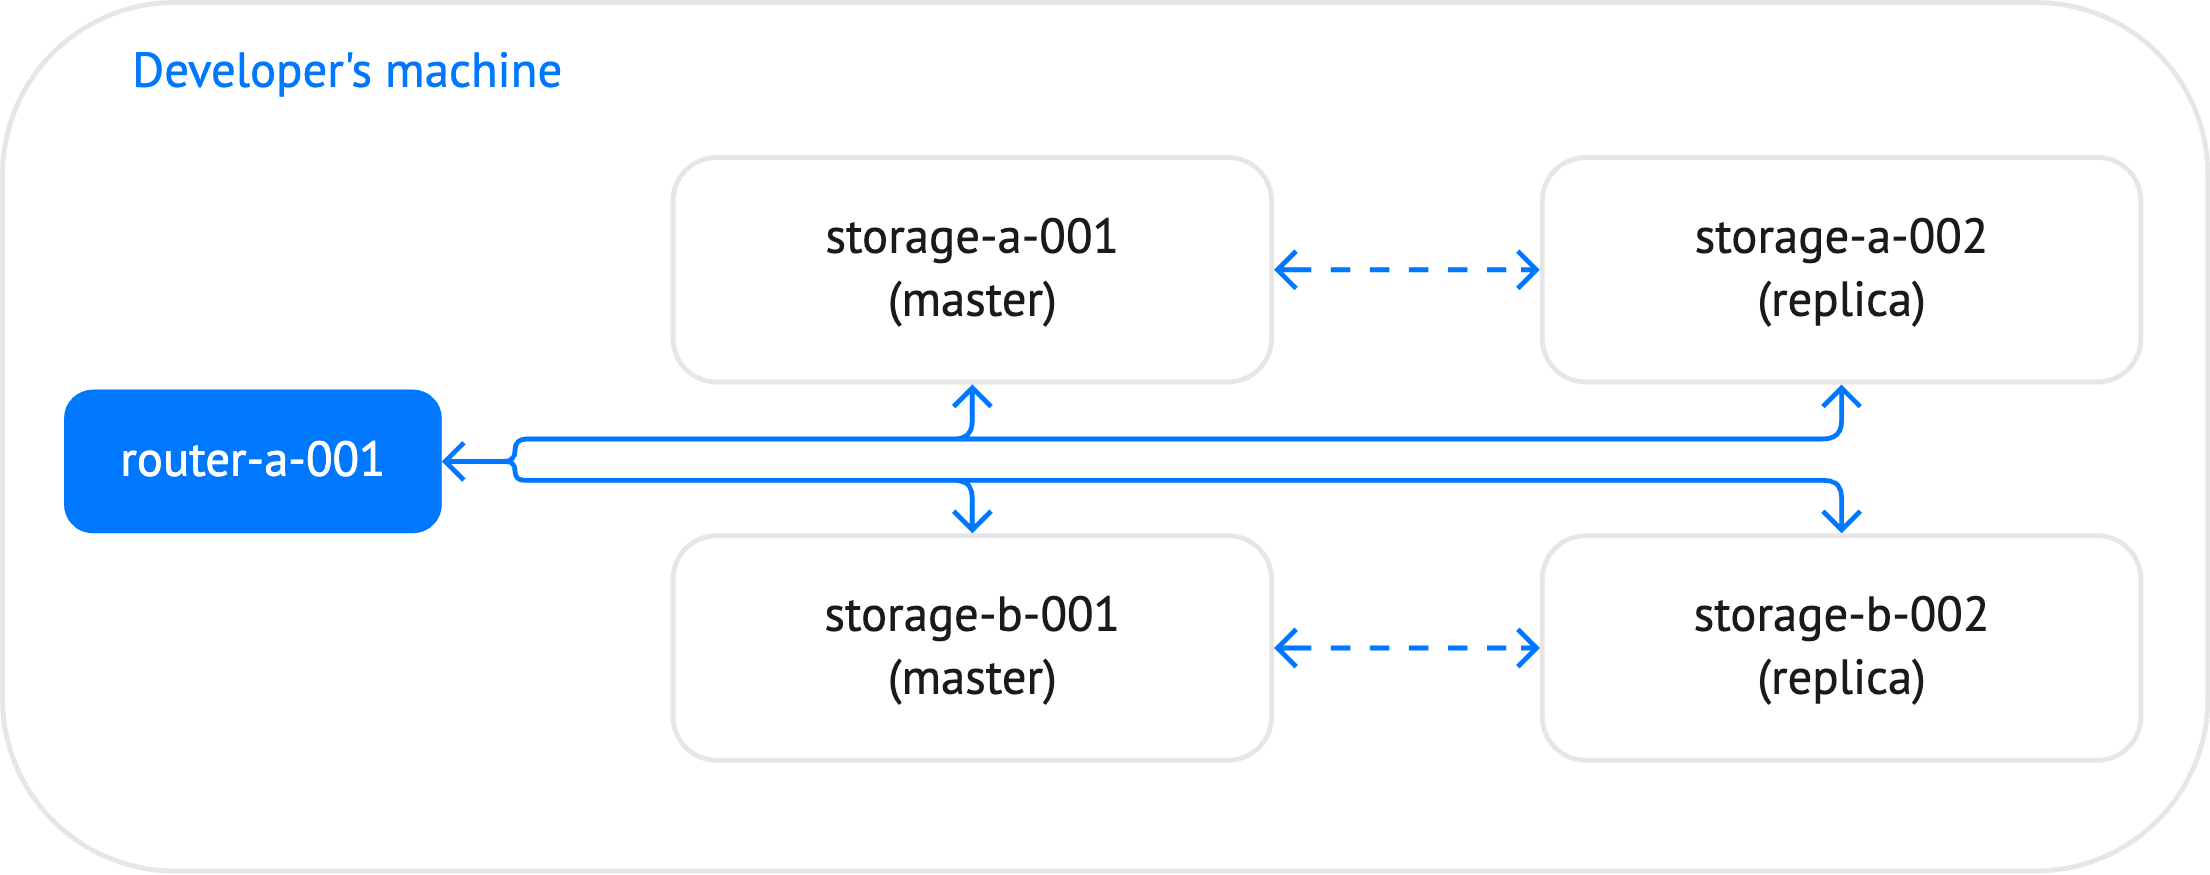
The cluster created in this tutorial includes 5 instances: one router and 4 storages, which constitute two replica sets.
Before starting this tutorial:
Install the tt utility.
-
Примечание
The tt utility provides the ability to install Tarantool software using the tt install command.
The tt create command can be used to create an application from a predefined or custom template.
For example, the built-in vshard_cluster template enables you to create a ready-to-run sharded cluster application.
In this tutorial, the application layout is prepared manually:
Create a tt environment in the current directory by executing the tt init command.
Inside the empty
instances.enableddirectory of the created tt environment, create thesharded_cluster_cruddirectory.Inside
instances.enabled/sharded_cluster_crud, create the following files:instances.ymlspecifies instances to run in the current environment.config.yamlspecifies the cluster configuration.storage.luacontains code specific for storages.router.luacontains code specific for a router.sharded_cluster_crud-scm-1.rockspecspecifies external dependencies required by the application.
The next Developing the application section shows how to configure the cluster and write code for routing read and write requests to different storages.
Open the instances.yml file and add the following content:
storage-a-001:
storage-a-002:
storage-b-001:
storage-b-002:
router-a-001:
This file specifies instances to run in the current environment.
This section describes how to configure the cluster in the config.yaml file.
Add the credentials configuration section:
credentials:
  users:
    replicator:
      password: 'topsecret'
      roles: [ replication ]
    storage:
      password: 'secret'
      roles: [ sharding ]
In this section, two users with the specified passwords are created:
- The
replicatoruser with thereplicationrole. - The
storageuser with theshardingrole.
These users are intended to maintain replication and sharding in the cluster.
Важно
It is not recommended to store passwords as plain text in a YAML configuration. Learn how to load passwords from safe storage such as external files or environment variables from Loading secrets from safe storage.
Add the iproto.advertise section:
iproto:
  advertise:
    peer:
      login: replicator
    sharding:
      login: storage
In this section, the following options are configured:
iproto.advertise.peerspecifies how to advertise the current instance to other cluster members. In particular, this option informs other replica set members that thereplicatoruser should be used to connect to the current instance.iproto.advertise.shardingspecifies how to advertise the current instance to a router and rebalancer.
The cluster topology defined in the following section also specifies the iproto.advertise.client option for each instance.
This option accepts a URI used to advertise the instance to clients.
For example, Tarantool Cluster Manager uses these URIs to connect to cluster instances.
Specify the total number of buckets in a sharded cluster using the sharding.bucket_count option:
sharding:
  bucket_count: 1000
Define the cluster topology inside the groups section. The cluster includes two groups:
storagesincludes two replica sets. Each replica set contains two instances.routersincludes one router instance.
Here is a schematic view of the cluster topology:
groups:
  storages:
    replicasets:
      storage-a:
        # ...
      storage-b:
        # ...
  routers:
    replicasets:
      router-a:
        # ...
To configure storages, add the following code inside the
groupssection:storages: roles: [ roles.crud-storage ] app: module: storage sharding: roles: [ storage ] replication: failover: manual replicasets: storage-a: leader: storage-a-001 instances: storage-a-001: iproto: listen: - uri: '127.0.0.1:3302' advertise: client: '127.0.0.1:3302' storage-a-002: iproto: listen: - uri: '127.0.0.1:3303' advertise: client: '127.0.0.1:3303' storage-b: leader: storage-b-001 instances: storage-b-001: iproto: listen: - uri: '127.0.0.1:3304' advertise: client: '127.0.0.1:3304' storage-b-002: iproto: listen: - uri: '127.0.0.1:3305' advertise: client: '127.0.0.1:3305'
The main group-level options here are:
roles: This option enables theroles.crud-storagerole provided by the CRUD module for all storage instances.app: Theapp.moduleoption specifies that code specific to storages should be loaded from thestoragemodule. This is explained below in the Adding storage code section.sharding: The sharding.roles option specifies that all instances inside this group act as storages. A rebalancer is selected automatically from two master instances.replication: The replication.failover option specifies that a leader in each replica set should be specified manually.replicasets: This section configures two replica sets that constitute cluster storages.
To configure a router, add the following code inside the
groupssection:routers: roles: [ roles.crud-router ] app: module: router sharding: roles: [ router ] replicasets: router-a: instances: router-a-001: iproto: listen: - uri: '127.0.0.1:3301' advertise: client: '127.0.0.1:3301'
The main group-level options here are:
roles: This option enables theroles.crud-routerrole provided by the CRUD module for a router instance.app: Theapp.moduleoption specifies that code specific to a router should be loaded from theroutermodule. This is explained below in the Adding router code section.sharding: The sharding.roles option specifies that an instance inside this group acts as a router.replicasets: This section configures a replica set with one router instance.
The resulting config.yaml file should look as follows:
credentials:
users:
replicator:
password: 'topsecret'
roles: [ replication ]
storage:
password: 'secret'
roles: [ sharding ]
iproto:
advertise:
peer:
login: replicator
sharding:
login: storage
sharding:
bucket_count: 1000
groups:
storages:
  roles: [ roles.crud-storage ]
  app:
    module: storage
  sharding:
    roles: [ storage ]
  replication:
    failover: manual
  replicasets:
    storage-a:
      leader: storage-a-001
      instances:
        storage-a-001:
          iproto:
            listen:
            - uri: '127.0.0.1:3302'
            advertise:
              client: '127.0.0.1:3302'
        storage-a-002:
          iproto:
            listen:
            - uri: '127.0.0.1:3303'
            advertise:
              client: '127.0.0.1:3303'
    storage-b:
      leader: storage-b-001
      instances:
        storage-b-001:
          iproto:
            listen:
            - uri: '127.0.0.1:3304'
            advertise:
              client: '127.0.0.1:3304'
        storage-b-002:
          iproto:
            listen:
            - uri: '127.0.0.1:3305'
            advertise:
              client: '127.0.0.1:3305'
routers:
  roles: [ roles.crud-router ]
  app:
    module: router
  sharding:
    roles: [ router ]
  replicasets:
    router-a:
      instances:
        router-a-001:
          iproto:
            listen:
            - uri: '127.0.0.1:3301'
            advertise:
              client: '127.0.0.1:3301'
Open the storage.lua file and define a space and indexes inside box.watch() as follows:
box.watch('box.status', function()
    if box.info.ro then
        return
    end

    box.schema.create_space('bands', {
        format = {
            { name = 'id', type = 'unsigned' },
            { name = 'bucket_id', type = 'unsigned' },
            { name = 'band_name', type = 'string' },
            { name = 'year', type = 'unsigned' }
        },
        if_not_exists = true
    })
    box.space.bands:create_index('id', { parts = { 'id' }, if_not_exists = true })
    box.space.bands:create_index('bucket_id', { parts = { 'bucket_id' }, unique = false, if_not_exists = true })
end)
- The box.schema.create_space() function creates a space.
Note that the created
bandsspace includes thebucket_idfield. This field represents a sharding key used to partition a dataset across different storage instances. - space_object:create_index() creates two indexes based on the
idandbucket_idfields.
Примечание
In a sharded space, uniqueness by secondary index is only guaranteed within a single shard, not across the whole cluster.
Open the router.lua file and load the vshard module as follows:
local vshard = require('vshard')
Open the sharded_cluster_crud-scm-1.rockspec file and add the following content:
package = 'sharded_cluster_crud'
version = 'scm-1'
source  = {
    url = '/dev/null',
}

dependencies = {
    'vshard == 0.1.27',
    'crud == 1.5.2'
}
build = {
    type = 'none';
}
The dependencies section includes the specified versions of the vshard and crud modules.
To install dependencies, you need to build the application.
In the terminal, open the tt environment directory.
Then, execute the tt build command:
$ tt build sharded_cluster_crud
   • Running rocks make
No existing manifest. Attempting to rebuild...
   • Application was successfully built
This installs the vshard and crud modules defined in the *.rockspec file to the .rocks directory.
To start all instances in the cluster, execute the tt start command:
$ tt start sharded_cluster_crud
   • Starting an instance [sharded_cluster_crud:storage-a-001]...
   • Starting an instance [sharded_cluster_crud:storage-a-002]...
   • Starting an instance [sharded_cluster_crud:storage-b-001]...
   • Starting an instance [sharded_cluster_crud:storage-b-002]...
   • Starting an instance [sharded_cluster_crud:router-a-001]...
After starting instances, you need to bootstrap the cluster as follows:
Connect to the router instance using
tt connect:$ tt connect sharded_cluster_crud:router-a-001 • Connecting to the instance... • Connected to sharded_cluster_crud:router-a-001
Call vshard.router.bootstrap() to perform the initial cluster bootstrap and distribute all buckets across the replica sets:
sharded_cluster_crud:router-a-001> vshard.router.bootstrap()
---
- true
...
To check the cluster status, execute vshard.router.info() on the router:
sharded_cluster_crud::router-a-001> vshard.router.info()
---
- replicasets:
    storage-b:
      replica:
        network_timeout: 0.5
        status: available
        uri: storage@127.0.0.1:3305
        name: storage-b-002
      bucket:
        available_rw: 500
      master:
        network_timeout: 0.5
        status: available
        uri: storage@127.0.0.1:3304
        name: storage-b-001
      name: storage-b
    storage-a:
      replica:
        network_timeout: 0.5
        status: available
        uri: storage@127.0.0.1:3303
        name: storage-a-002
      bucket:
        available_rw: 500
      master:
        network_timeout: 0.5
        status: available
        uri: storage@127.0.0.1:3302
        name: storage-a-001
      name: storage-a
  bucket:
    unreachable: 0
    available_ro: 0
    unknown: 0
    available_rw: 1000
  status: 0
  alerts: []
...
The output includes the following sections:
replicasets: contains information about storages and their availability.bucket: displays the total number of read-write and read-only buckets that are currently available for this router.status: the number from 0 to 3 that indicates whether there are any issues with the cluster. 0 means that there are no issues.alerts: might describe the exact issues related to bootstrapping a cluster, for example, connection issues, failover events, or unidentified buckets.
To insert sample data, call
crud.insert_many()on the router:crud.insert_many('bands', { { 1, box.NULL, 'Roxette', 1986 }, { 2, box.NULL, 'Scorpions', 1965 }, { 3, box.NULL, 'Ace of Base', 1987 }, { 4, box.NULL, 'The Beatles', 1960 }, { 5, box.NULL, 'Pink Floyd', 1965 }, { 6, box.NULL, 'The Rolling Stones', 1962 }, { 7, box.NULL, 'The Doors', 1965 }, { 8, box.NULL, 'Nirvana', 1987 }, { 9, box.NULL, 'Led Zeppelin', 1968 }, { 10, box.NULL, 'Queen', 1970 } })
Calling this function distributes data evenly across the cluster nodes.
To get a tuple by the specified ID, call the
crud.get()function:sharded_cluster_crud:router-a-001> crud.get('bands', 4) --- - rows: - [4, 161, 'The Beatles', 1960] metadata: [{'name': 'id', 'type': 'unsigned'}, {'name': 'bucket_id', 'type': 'unsigned'}, {'name': 'band_name', 'type': 'string'}, {'name': 'year', 'type': 'unsigned'}] - null ...
To insert a new tuple, call
crud.insert():sharded_cluster_crud:router-a-001> crud.insert('bands', {11, box.NULL, 'The Who', 1962}) --- - rows: - [11, 652, 'The Who', 1962] metadata: [{'name': 'id', 'type': 'unsigned'}, {'name': 'bucket_id', 'type': 'unsigned'}, {'name': 'band_name', 'type': 'string'}, {'name': 'year', 'type': 'unsigned'}] - null ...
To check how data is distributed across the replica sets, follow the steps below:
Connect to any storage in the
storage-areplica set:$ tt connect sharded_cluster_crud:storage-a-001 • Connecting to the instance... • Connected to sharded_cluster_crud:storage-a-001
Then, select all tuples in the
bandsspace:sharded_cluster_crud:storage-a-001> box.space.bands:select() --- - - [1, 477, 'Roxette', 1986] - [2, 401, 'Scorpions', 1965] - [4, 161, 'The Beatles', 1960] - [5, 172, 'Pink Floyd', 1965] - [6, 64, 'The Rolling Stones', 1962] - [8, 185, 'Nirvana', 1987] ...
Connect to any storage in the
storage-breplica set:$ tt connect sharded_cluster_crud:storage-b-001 • Connecting to the instance... • Connected to sharded_cluster_crud:storage-b-001
Select all tuples in the
bandsspace to make sure it contains another subset of data:sharded_cluster_crud:storage-b-001> box.space.bands:select() --- - - [3, 804, 'Ace of Base', 1987] - [7, 693, 'The Doors', 1965] - [9, 644, 'Led Zeppelin', 1968] - [10, 569, 'Queen', 1970] - [11, 652, 'The Who', 1962] ...