Administrator’s guide
This guide explains how to deploy and manage a Tarantool cluster with Tarantool Cartridge.
Note
For more information on managing Tarantool instances, see the server administration section of the Tarantool manual.
Before deploying the cluster, familiarize yourself with the notion of cluster roles and deploy Tarantool instances according to the desired cluster topology.
Cartridge is compatible with Tarantool 1.10 and Tarantool 2.x. Cartridge doesn’t support Tarantool 3.0 and higher.
To deploy the cluster, first, configure your Tarantool instances according to the desired cluster topology, for example:
my_app.router: {"advertise_uri": "localhost:3301", "http_port": 8080, "workdir": "./tmp/router"}
my_app.storage_A_master: {"advertise_uri": "localhost:3302", "http_enabled": False, "workdir": "./tmp/storage-a-master"}
my_app.storage_A_replica: {"advertise_uri": "localhost:3303", "http_enabled": False, "workdir": "./tmp/storage-a-replica"}
my_app.storage_B_master: {"advertise_uri": "localhost:3304", "http_enabled": False, "workdir": "./tmp/storage-b-master"}
my_app.storage_B_replica: {"advertise_uri": "localhost:3305", "http_enabled": False, "workdir": "./tmp/storage-b-replica"}
Then start the instances, for example using
cartridge CLI:
$ cartridge start my_app --cfg demo.yml --run-dir ./tmp/run
Important
cartridge-cli is deprecated in favor of the tt CLI utility.
This guide uses cartridge-cli as a native tool for Cartridge applications
development. However, we encourage you to switch to tt in order to simplify
the migration to Tarantool 3.0 and newer versions.
And bootstrap the cluster.
You can do this via the Web interface which is available at
http://<instance_hostname>:<instance_http_port>
(in this example, http://localhost:8080).
You can bootstrap a cluster from an existing cluster (original cluster in the example
below) via the argparse option TARANTOOL_BOOTSTRAP_FROM or --bootstrap_from
in the following form:
TARANTOOL_BOOTSTRAP_FROM=admin:SECRET-ORIGINAL-CLUSTER-COOKIE@HOST:MASTER_PORT,....
That option should be present on each instance in replicasets of the target cluster.
Make sure that you’ve prepared a valid configuration for the target cluster.
A valid topology should contain the same replicaset uuids for each replicaset
and instance uuids that differ from original cluster. You can list several instances in this option.
This is required for the latests Tarantool bootstrap policy.
Several notes:
- You can bootstrap specific replicasets from a cluster (for example, data nodes only) instead of the whole cluster.
- Don’t load data in the target cluster while bootstrapping. If you need to hot switch between original and target cluster, stop data loading in original cluster until bootstrapping is completed.
- Check logs and
box.info.replicationon target cluster after bootstrapping. If something went wrong, try again.
Example of valid data in edit_topology request:
Original cluster topology:
{
    "replicasets": [
        {
            "alias": "router-original",
            "uuid": "aaaaaaaa-aaaa-0000-0000-000000000000",
            "join_servers": [
                {
                    "uri": "localhost:3301",
                    "uuid": "aaaaaaaa-aaaa-0000-0000-000000000001"
                }
            ],
            "roles": ["vshard-router", "failover-coordinator"]
        },
        {
            "alias": "storage-original",
            "uuid": "bbbbbbbb-0000-0000-0000-000000000000",
            "weight": 1,
            "join_servers": [
                {
                    "uri": "localhost:3302",
                    "uuid": "bbbbbbbb-bbbb-0000-0000-000000000001"
                }
            ],
            "roles": ["vshard-storage"]
        }
    ]
}
Target cluster topology:
{
    "replicasets": [
        {
            "alias": "router-original",
            "uuid": "cccccccc-cccc-0000-0000-000000000000", // <- this is dataless router,
            // it's not necessary to bootstrap it from original cluster
            "join_servers": [
                {
                    "uri": "localhost:13301", // <- different uri
                    "uuid": "cccccccc-cccc-0000-0000-000000000001"
                }
            ],
            "roles": ["vshard-router", "failover-coordinator"]
        },
        {
            "alias": "storage-original",
            "uuid": "bbbbbbbb-0000-0000-0000-000000000000", // replicaset_uuid is the same as in the original cluster
            // that allows us bootstrap target cluster from original cluster
            "weight": 1,
            "join_servers": [
                {
                    "uri": "localhost:13302", // <- different uri
                    "uuid": "bbbbbbbb-bbbb-0000-0000-000000000002" // <- different instance_uuid
                }
            ],
            "roles": ["vshard-storage"]
        }
    ]
}
In the web interface, do the following:
Depending on the authentication state:
If enabled (in production), enter your credentials and click Login:

If disabled (for easier testing), simply proceed to configuring the cluster.
Click Сonfigure next to the first unconfigured server to create the first replica set – solely for the router (intended for compute-intensive workloads).

In the pop-up window, check the
vshard-routerrole or any custom role that hasvshard-routeras a dependent role (in this example, this is a custom role namedapp.roles.api).(Optional) Specify a display name for the replica set, for example
router.
Note
As described in the built-in roles section, it is a good practice to enable workload-specific cluster roles on instances running on physical servers with workload-specific hardware.
Click Create replica set and see the newly-created replica set in the web interface:

Warning
Be careful: after an instance joins a replica set, you CAN NOT revert this or make the instance join any other replica set.
Create another replica set for a master storage node (intended for transaction-intensive workloads).
Check the
vshard-storagerole or any custom role that hasvshard-storageas a dependent role (in this example, this is a custom role namedapp.roles.storage).(Optional) Check a specific group, for example
hot. Replica sets withvshard-storageroles can belong to different groups. In our example, these arehotorcoldgroups meant to process hot and cold data independently. These groups are specified in the cluster’s configuration file; by default, a cluster has no groups.(Optional) Specify a display name for the replica set, for example
hot-storage.Click Create replica set.

(Optional) If required by topology, populate the second replica set with more storage nodes:
Click Configure next to another unconfigured server dedicated for transaction-intensive workloads.
Click Join Replica Set tab.
Select the second replica set, and click Join replica set to add the server to it.

Depending on cluster topology:
- add more instances to the first or second replica sets, or
- create more replica sets and populate them with instances meant to handle a specific type of workload (compute or transactions).
For example:

(Optional) By default, all new
vshard-storagereplica sets get a weight of1before thevshardbootstrap in the next step.
Note
In case you add a new replica set aftervshardbootstrap, as described in the topology change section, it will get a weight of 0 by default.To make different replica sets store different numbers of buckets, click Edit next to a replica set, change its default weight, and click Save:
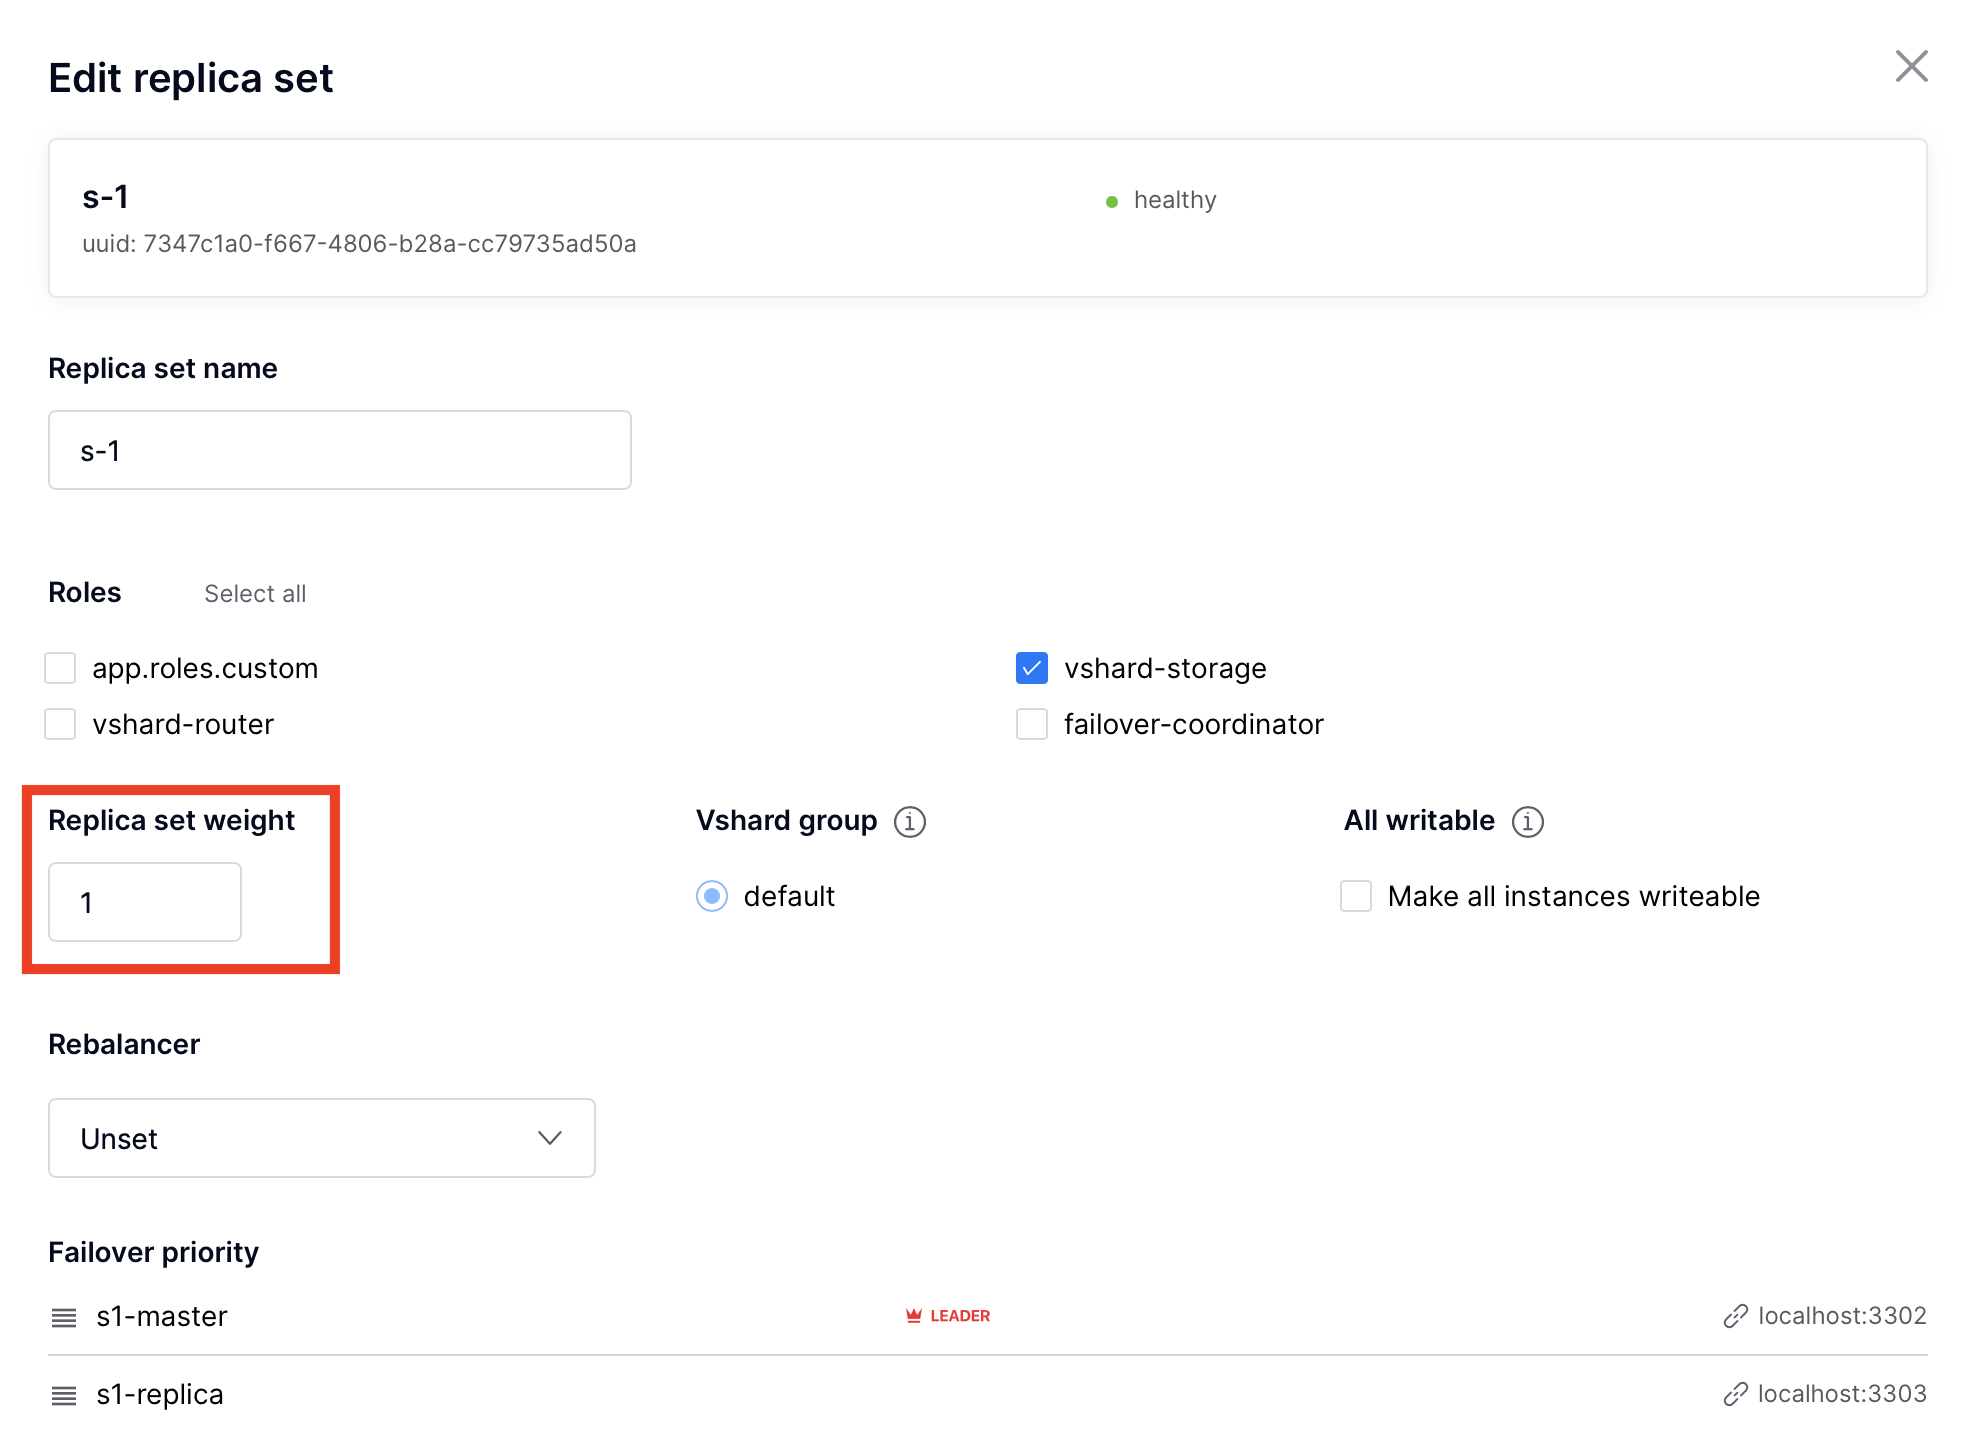
For more information on buckets and replica set’s weights, see the vshard module documentation.
Bootstrap
vshardby clicking the corresponding button, or by sayingcartridge.admin.boostrap_vshard()over the administrative console.This command creates virtual buckets and distributes them among storages.
From now on, all cluster configuration can be done via the web interface.

Cluster configuration is specified in a YAML configuration file. This file includes cluster topology and role descriptions.
All instances in Tarantool cluster have the same configuration. To this end, every instance stores a copy of the configuration file, and the cluster keeps these copies in sync: as you submit updated configuration in the Web interface, the cluster validates it (and rejects inappropriate changes) and distributes automatically across the cluster.
To update the configuration:
Click Configuration files tab.
(Optional) Click Downloaded to get hold of the current configuration file.
Update the configuration file.
You can add/change/remove any sections except system ones:
topology,vshard, andvshard_groups.To remove a section, simply remove it from the configuration file.
Click Upload configuration button to upload configuration file.
You will see a message in the lower part of the screen saying whether configuration was uploaded successfully, and an error description if the new configuration was not applied.
This chapter explains how to:
- change the cluster topology,
- enable automatic failover,
- switch the replica set’s master manually,
- deactivate replica sets, and
- expel instances.
Upon adding a newly deployed instance to a new or existing replica set:
The cluster validates the configuration update by checking if the new instance is available using the membership module.
Note
The
membershipmodule works over the UDP protocol and can operate before thebox.cfgfunction is called.All the nodes in the cluster must be healthy for validation success.
The new instance waits until another instance in the cluster receives the configuration update and discovers it, again, using the
membershipmodule. On this step, the new instance does not have a UUID yet.Once the instance realizes its presence is known to the cluster, it calls the box.cfg function and starts living its life.
An optimal strategy for connecting new nodes to the cluster is to deploy a new zero-weight replica set instance by instance, and then increase the weight. Once the weight is updated and all cluster nodes are notified of the configuration change, buckets start migrating to new nodes.
To populate the cluster with more nodes, do the following:
Deploy new Tarantool instances as described in the deployment section.
If new nodes do not appear in the Web interface, click Probe server and specify their URIs manually.

If a node is accessible, it will appear in the list.
In the Web interface:
Create a new replica set with one of the new instances: click Configure next to an unconfigured server, check the necessary roles, and click Create replica set:
Note
In case you are adding a new
vshard-storageinstance, remember that all such instances get a0weight by default after thevshardbootstrap which happened during the initial cluster deployment.
Or add the instances to existing replica sets: click Configure next to an unconfigured server, click Join replica set tab, select a replica set, and click Join replica set.
If necessary, repeat this for more instances to reach the desired redundancy level.
In case you are deploying a new
vshard-storagereplica set, populate it with data when you are ready: click Edit next to the replica set in question, increase its weight, and click Save to start data rebalancing.
As an alternative to the web interface, you can view and change cluster topology
via GraphQL. The cluster’s endpoint for serving GraphQL queries is /admin/api.
You can use any third-party GraphQL client like
GraphiQL or
Altair.
Examples:
listing all servers in the cluster:
query {
    servers { alias uri uuid }
}
listing all replica sets with their servers:
query {
    replicasets {
        uuid
        roles
        servers { uri uuid }
    }
}
joining a server to a new replica set with a storage role enabled:
mutation {
    join_server(
        uri: "localhost:33003"
        roles: ["vshard-storage"]
    )
}
Rebalancing (resharding) is initiated periodically and upon adding a new replica
set with a non-zero weight to the cluster. For more information, see the
rebalancing process section
of the vshard module documentation.
The most convenient way to trace through the process of rebalancing is to monitor the number of active buckets on storage nodes. Initially, a newly added replica set has 0 active buckets. After a few minutes, the background rebalancing process begins to transfer buckets from other replica sets to the new one. Rebalancing continues until the data is distributed evenly among all replica sets.
To monitor the current number of buckets, connect to any Tarantool instance over the administrative console, and say:
tarantool> vshard.storage.info().bucket
---
- receiving: 0
  active: 1000
  total: 1000
  garbage: 0
  sending: 0
...
The number of buckets may be increasing or decreasing depending on whether the rebalancer is migrating buckets to or from the storage node.
For more information on the monitoring parameters, see the monitoring storages section.
To deactivate an entire replica set (e.g., to perform maintenance on it) means to move all of its buckets to other sets.
To deactivate a set, do the following:
Click Edit next to the set in question.
Set its weight to
0and click Save:
Wait for the rebalancing process to finish migrating all the set’s buckets away. You can monitor the current bucket number as described in the data rebalancing section.
Sometimes when instances are not healthy, you may want to disable them to perform some operations on cluster (e.g. apply new cluster config).
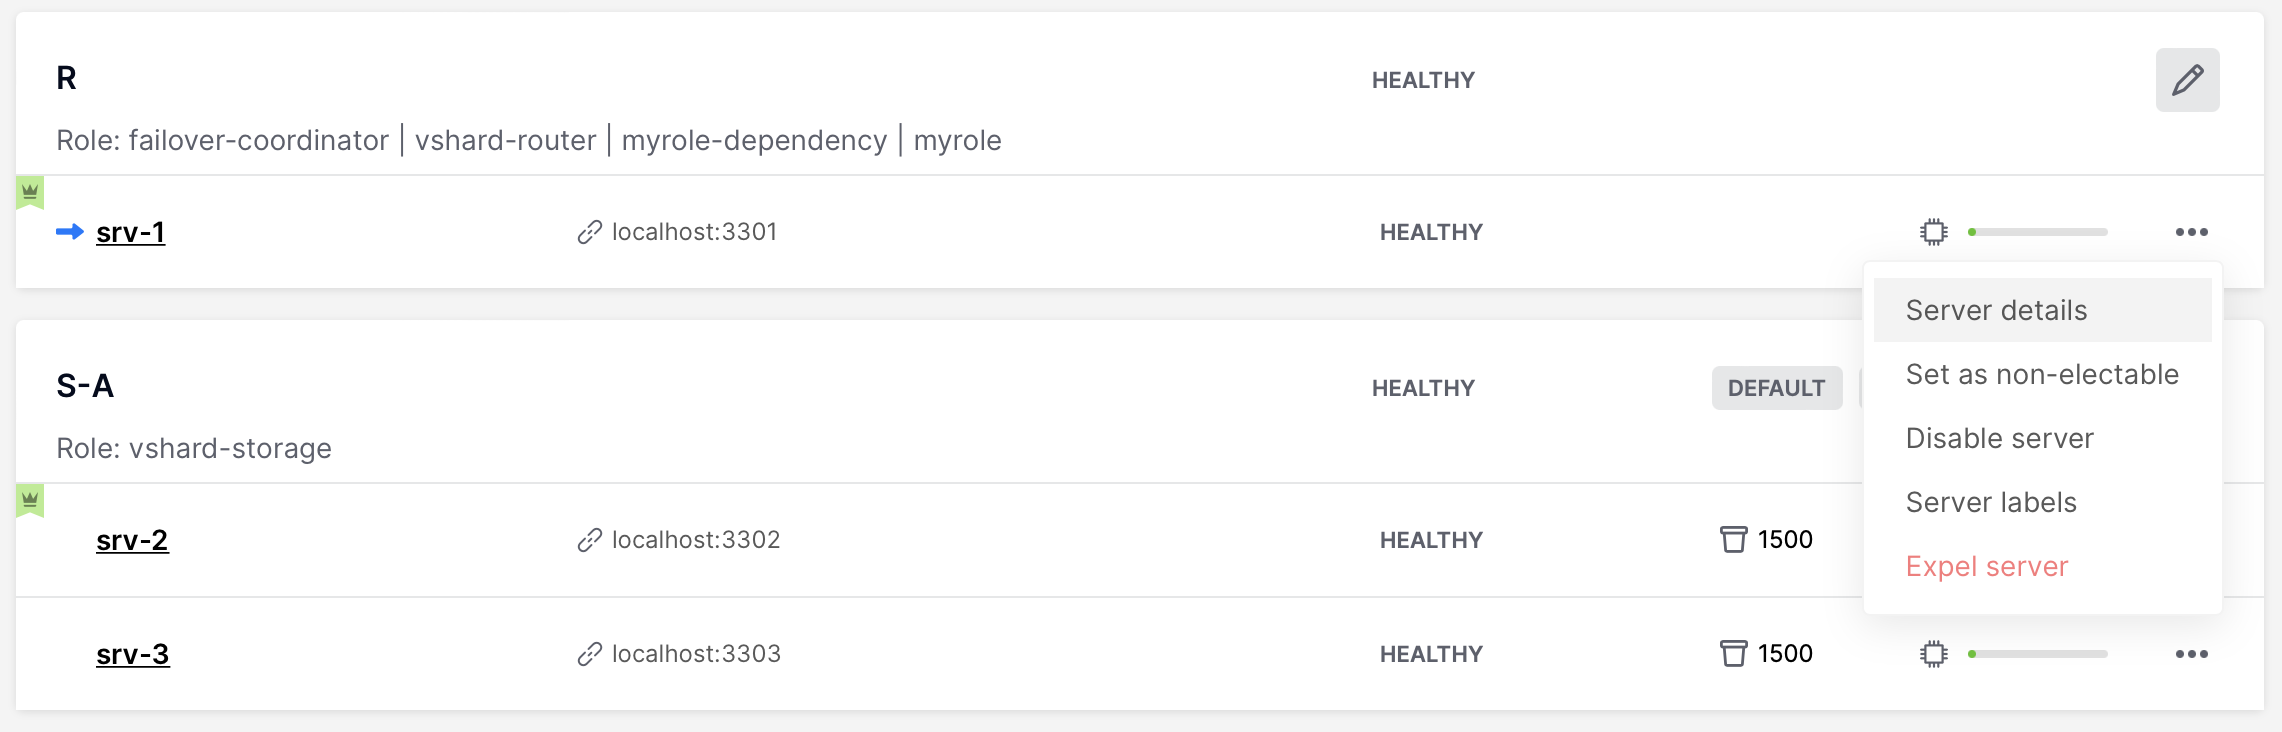
To disable an instance, click … next to it, then click Disable server:

Then instance will be marked as disabled and will not participate in cluster configuration:

You can also disable an active leader, then the leader will be switched to another instance.
Disabling/enabling instances automatically via GraphQL mutation { cluster { disable_servers(uuids: [...]) { } } } /
mutation { cluster { enable_servers(uuids: [...]) { } } } call vshard.storage.disable() /
vshard.storage.enable() on instances with VShard storage enabled.
Note that simple disable of instances via edit_server button or GraphQL won’t
disable VShard storages.
Instances will be disabled automatically when a disk failure occurs (see “issues and suggestions” topic below for details).
Note
Don’t forget to enable instance back after you fix them!
Once an instance is expelled, it can never participate in the cluster again as every instance will reject it.
To expel an instance, stop it, then click … next to it, then click Expel server and Expel:

Note
There are two restrictions:
- You can’t expel a leader if it has a replica. Switch leadership first.
- You can’t expel a vshard-storage if it has buckets. Set the weight to zero and wait until rebalancing is completed.
Since Cartridge 2.8.0 you will see an issue if you had a replica set with an
expelled instance in box.space._cluster. You can fix it by manually remove expelled
instance from box.space._cluster:
-- call thin on leader:
local confapplier = require('cartridge.confapplier')
local topology = require('cartridge.topology')
local topology_cfg = confapplier.get_readonly('topology')
local fun = require('fun')
for _, uuid, _ in fun.filter(topology.expelled, topology_cfg.servers) do
    box.space._cluster.index.uuid:delete(uuid)
end
Note
- Do not expel instances until they’re stopped.
- Do not forget to clean expelled instence’s data directory and remove it from your pipelines.
- You can not return expelled instance to the cluster.
In a master-replica cluster configuration with automatic failover enabled, if the user-specified master of any replica set fails, the cluster automatically chooses a replica from the priority list and grants it the active master role (read/write). To learn more about details of failover work, see failover documentation.
The leader is the first instance according to the topology configuration.
No automatic decisions are made. You can manually change the leader in the failover
priority list or call box.cfg{read_only = false} on any instance.
To disable failover:
Click Failover:
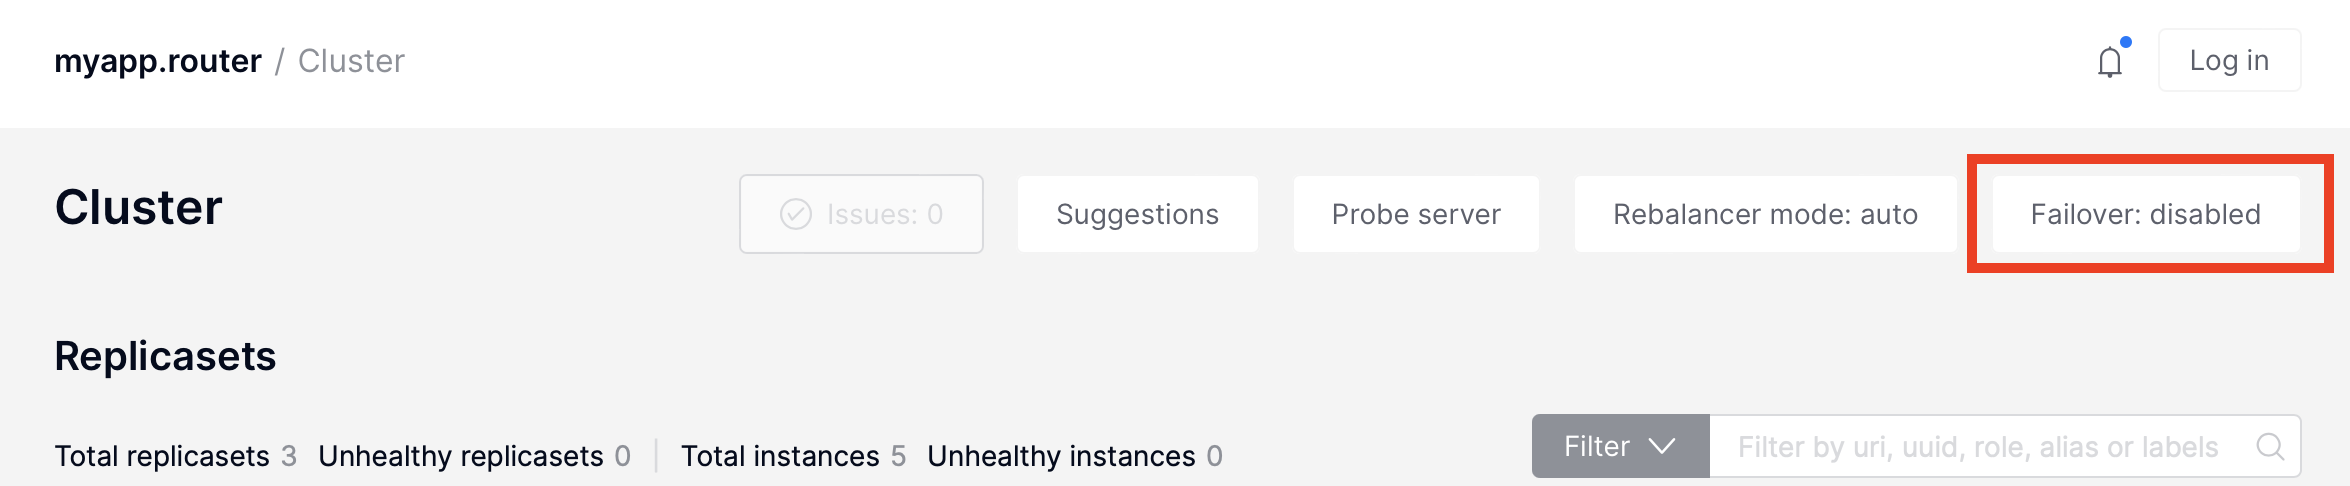
In the Failover control box, select the Disabled mode:

Important
The eventual failover mode is not recommended for use on large clusters
in production. If you have a high load production cluster, use the stateful
failover with etcd instead.
The leader isn’t elected consistently. Every instance thinks the leader is the first healthy server in the replicaset. The instance health is determined according to the membership status (the SWIM protocol).
To set the priority in a replica set:
Click Edit next to the replica set in question.
Scroll to the bottom of the Edit replica set box to see the list of servers.
Drag replicas to their place in the priority list, and click Save:

To enable eventual failover:
Click Failover:
In the Failover control box, select the Eventual mode:

Important
The stateful failover mode with Tarantool Stateboard is not recommended for use on large clusters in production. If you have a high load production cluster, use the stateful failover with etcd instead.
Leader appointments are polled from the external state provider.
Decisions are made by one of the instances with the failover-coordinator
role enabled. There are two options of external state provider:
Tarantool Stateboard - you need to run instance of stateboard with command
tarantool stateboard.init.lua.etcd v2 - you need to run and configure etcd cluster. Note that only etcd v2 API is supported, so you can still use etcd v3 with
ETCD_ENABLE_V2=true.Note
etcd 3.6.0 and higher does not support the
ETCD_ENABLE_V2option. Use etcd versions below 3.6.0 to ensure that the stateful failover mode works correctly with etcd.
To enable stateful failover:
Run stateboard or etcd
Click Failover:
In the Failover control box, select the Stateful mode:

Check the necessary parameters.
In this mode, you can choose the leader with the Promote a leader button in the WebUI (or a GraphQL request).

You can also check state provider status in failover settings tab (it only works after stateful failover was enabled):

Important
Raft failover in Cartridge is in beta. Don’t use it in production.
The replicaset leader is chosen by built-in Raft, then the other replicasets get information about leader change from membership. Raft parameters can be configured by environment variables.
To enable the Raft failover:
Make sure that your Tarantool version is higher than 2.10.0
Click Failover:
In the Failover control box, select the Raft mode:
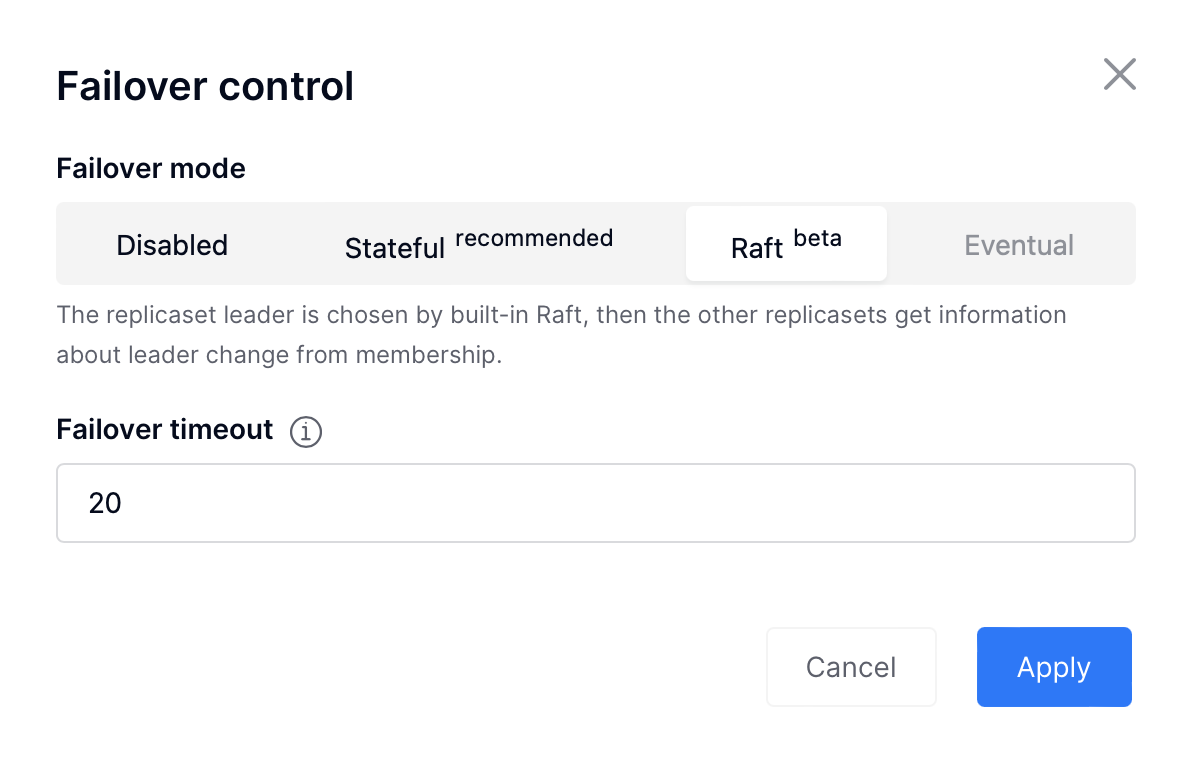
Check the necessary parameters.
In this mode, you can choose the leader with the Promote a leader button in the WebUI (or a
GraphQL request or manual call box.ctl.promote).
To change failover priority list:
Click the Edit button next to the replica set in question:

Scroll to the bottom of the Edit replica set box to see the list of servers. The server on the top is the master.

Drag a required server to the top position and click Save.
In case of eventual failover, the new master will automatically enter the read/write mode, while the ex-master will become read-only. This works for any roles.
On the Users tab, you can enable/disable authentication as well as add, remove, edit, and view existing users who can access the web interface.

Notice that the Users tab is available only if authorization in the web interface is implemented.
Also, some features (like deleting users) can be disabled in the cluster
configuration; this is regulated by the
auth_backend_name
option passed to cartridge.cfg().
Tarantool has an embedded mechanism for asynchronous replication. As a consequence, records are distributed among the replicas with a delay, so conflicts can arise.
To prevent conflicts, the special trigger space.before_replace is used. It is
executed every time before making changes to the table for which it was configured.
The trigger function is implemented in the Lua programming language. This function
takes the original and new values of the tuple to be modified as its arguments.
The returned value of the function is used to change the result of the operation:
this will be the new value of the modified tuple.
For insert operations, the old value is absent, so nil is passed as the first
argument.
For delete operations, the new value is absent, so nil is passed as the second
argument. The trigger function can also return nil, thus turning this operation
into delete.
This example shows how to use the space.before_replace trigger to prevent
replication conflicts. Suppose we have a box.space.test table that is modified in
multiple replicas at the same time. We store one payload field in this table. To
ensure consistency, we also store the last modification time in each tuple of this
table and set the space.before_replace trigger, which gives preference to
newer tuples. Below is the code in Lua:
fiber = require('fiber')
-- define a function that will modify the function test_replace(tuple)
        -- add a timestamp to each tuple in the space
        tuple = box.tuple.new(tuple):update{{'!', 2, fiber.time()}}
        box.space.test:replace(tuple)
end
box.cfg{ } -- restore from the local directory
-- set the trigger to avoid conflicts
box.space.test:before_replace(function(old, new)
        if old ~= nil and new ~= nil and new[2] < old[2] then
                return old -- ignore the request
        end
        -- otherwise apply as is
end)
box.cfg{ replication = {...} } -- subscribe
This section describes parameters you can monitor over the administrative console.
Each Tarantool node (router/storage) provides an administrative console
(Command Line Interface) for debugging, monitoring, and troubleshooting. The
console acts as a Lua interpreter and displays the result in the human-readable
YAML format.
To connect to a Tarantool instance via the console, you can choose one of the commands:
Using the
ttCLI utility:$ tt connect <instance_hostname>:<port>
If you have cartridge-cli installed:
$ cartridge connect <instance_hostname>:<port>
If you ran Cartridge locally:
$ cartridge enter <node_name>
Old-fashioned way with
tarantoolctl:$ tarantoolctl connect <instance_hostname>:<port>
where the <instance_hostname>:<port> is the instance’s URI.
Use vshard.storage.info() to obtain information on storage nodes.
tarantool> vshard.storage.info()
---
- replicasets:
    <replicaset_2>:
    uuid: <replicaset_2>
    master:
        uri: storage:storage@127.0.0.1:3303
    <replicaset_1>:
    uuid: <replicaset_1>
    master:
        uri: storage:storage@127.0.0.1:3301
  bucket: <!-- buckets status
    receiving: 0 <!-- buckets in the RECEIVING state
    active: 2 <!-- buckets in the ACTIVE state
    garbage: 0 <!-- buckets in the GARBAGE state (are to be deleted)
    total: 2 <!-- total number of buckets
    sending: 0 <!-- buckets in the SENDING state
  status: 1 <!-- the status of the replica set
  replication:
    status: disconnected <!-- the status of the replication
    idle: <idle>
  alerts:
  - ['MASTER_IS_UNREACHABLE', 'Master is unreachable: disconnected']
| Code | Critical level | Description |
| 0 | Green | A replica set works in a regular way. |
| 1 | Yellow | There are some issues, but they don’t affect a replica set efficiency (worth noticing, but don’t require immediate intervention). |
| 2 | Orange | A replica set is in a degraded state. |
| 3 | Red | A replica set is disabled. |
MISSING_MASTER– No master node in the replica set configuration.Critical level: Orange.
Cluster condition: Service is degraded for data-change requests to the replica set.
Solution: Set the master node for the replica set in the configuration using API.
UNREACHABLE_MASTER– No connection between the master and the replica.Critical level:
- If idle value doesn’t exceed T1 threshold (1 s.)—Yellow,
- If idle value doesn’t exceed T2 threshold (5 s.)—Orange,
- If idle value exceeds T3 threshold (10 s.)—Red.
Cluster condition: For read requests to replica, the data may be obsolete compared with the data on master.
Solution: Reconnect to the master: fix the network issues, reset the current master, switch to another master.
LOW_REDUNDANCY– Master has access to a single replica only.Critical level: Yellow.
Cluster condition: The data storage redundancy factor is equal to 2. It is lower than the minimal recommended value for production usage.
Solution: Check cluster configuration:
- If only one master and one replica are specified in the configuration, it is recommended to add at least one more replica to reach the redundancy factor of 3.
- If three or more replicas are specified in the configuration, consider checking the replicas’ states and network connection among the replicas.
INVALID_REBALANCING– Rebalancing invariant was violated. During migration, a storage node can either send or receive buckets. So it shouldn’t be the case that a replica set sends buckets to one replica set and receives buckets from another replica set at the same time.Critical level: Yellow.
Cluster condition: Rebalancing is on hold.
Solution: There are two possible reasons for invariant violation:
- The
rebalancerhas crashed. - Bucket states were changed manually.
Either way, please contact Tarantool support.
- The
HIGH_REPLICATION_LAG– Replica’s lag exceeds T1 threshold (1 sec.).Critical level:
- If the lag doesn’t exceed T1 threshold (1 sec.)—Yellow;
- If the lag exceeds T2 threshold (5 sec.)—Orange.
Cluster condition: For read-only requests to the replica, the data may be obsolete compared with the data on the master.
Solution: Check the replication status of the replica. Further instructions are given in the Tarantool troubleshooting guide.
OUT_OF_SYNC– Mal-synchronization occurred. The lag exceeds T3 threshold (10 sec.).Critical level: Red.
Cluster condition: For read-only requests to the replica, the data may be obsolete compared with the data on the master.
Solution: Check the replication status of the replica. Further instructions are given in the Tarantool troubleshooting guide.
UNREACHABLE_REPLICA– One or multiple replicas are unreachable.Critical level: Yellow.
Cluster condition: Data storage redundancy factor for the given replica set is less than the configured factor. If the replica is next in the queue for rebalancing (in accordance with the weight configuration), the requests are forwarded to the replica that is still next in the queue.
Solution: Check the error message and find out which replica is unreachable. If a replica is disabled, enable it. If this doesn’t help, consider checking the network.
UNREACHABLE_REPLICASET– All replicas except for the current one are unreachable. Critical level: Red.Cluster condition: The replica stores obsolete data.
Solution: Check if the other replicas are enabled. If all replicas are enabled, consider checking network issues on the master. If the replicas are disabled, check them first: the master might be working properly.
Use vshard.router.info() to obtain information on the router.
tarantool> vshard.router.info()
---
- replicasets:
    <replica set UUID>:
      master:
        status: <available / unreachable / missing>
        uri: <!-- URI of master
        uuid: <!-- UUID of instance
      replica:
        status: <available / unreachable / missing>
        uri: <!-- URI of replica used for slave requests
        uuid: <!-- UUID of instance
      uuid: <!-- UUID of replica set
    <replica set UUID>: ...
    ...
  status: <!-- status of router
  bucket:
    known: <!-- number of buckets with the known destination
    unknown: <!-- number of other buckets
  alerts: [<alert code>, <alert description>], ...
| Code | Critical level | Description |
| 0 | Green | The router works in a regular way. |
| 1 | Yellow | Some replicas are unreachable (affects the speed of executing read requests). |
| 2 | Orange | Service is degraded for changing data. |
| 3 | Red | Service is degraded for reading data. |
Note
Depending on the nature of the issue, use either the UUID of a replica, or the UUID of a replica set.
MISSING_MASTER– The master in one or multiple replica sets is not specified in the configuration.Critical level: Orange.
Cluster condition: Partial degrade for data-change requests.
Solution: Specify the master in the configuration.
UNREACHABLE_MASTER– Therouterlost connection with the master of one or multiple replica sets.Critical level: Orange.
Cluster condition: Partial degrade for data-change requests.
Solution: Restore connection with the master. First, check if the master is enabled. If it is, consider checking the network.
SUBOPTIMAL_REPLICA– There is a replica for read-only requests, but this replica is not optimal according to the configured weights. This means that the optimal replica is unreachable.Critical level: Yellow.
Cluster condition: Read-only requests are forwarded to a backup replica.
Solution: Check the status of the optimal replica and its network connection.
UNREACHABLE_REPLICASET– A replica set is unreachable for both read-only and data-change requests.Critical Level: Red.
Cluster condition: Partial degrade for read-only and data-change requests.
Solution: The replica set has an unreachable master and replica. Check the error message to detect this replica set. Then fix the issue in the same way as for UNREACHABLE_REPLICA.
Cartridge displays cluster and instances issues in WebUI:
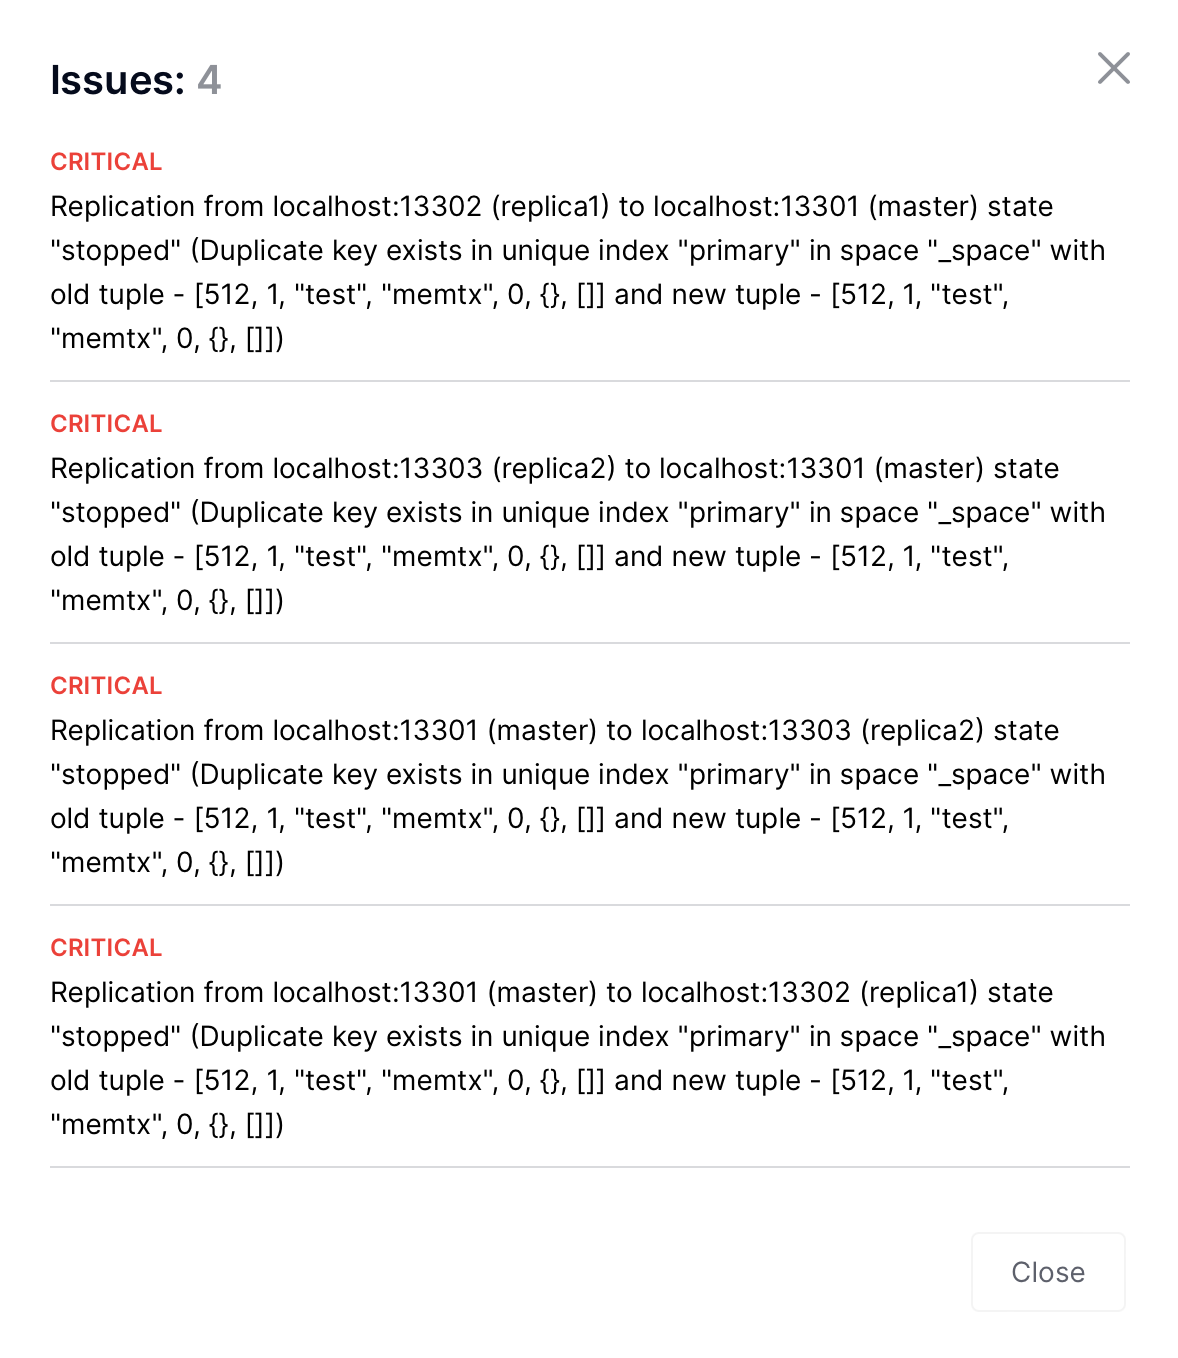
Replication
- critical: “Replication from … to … isn’t running” –
when
box.info.replication.upstream == nil; - critical: “Replication from … to … state “stopped”/”orphan”/etc. (…)”;
- warning: “Replication from … to …: high lag” –
when
upstream.lag > box.cfg.replication_sync_lag; - warning: “Replication from … to …: long idle” –
when
upstream.idle > 2 * box.cfg.replication_timeout;

Cartridge can propose you to fix some of replication issues by restarting replication:

- critical: “Replication from … to … isn’t running” –
when
Failover:
- warning: “Can’t obtain failover coordinator (…)”;
- warning: “There is no active failover coordinator” – all of the cooridinator instances are probably dead or unavailable;
- warning: “Failover is stuck on …: Error fetching appointments (…)”;
- warning: “Failover is stuck on …: Failover fiber is dead” – this is likely a bug;
Switchover:
- warning: “Consistency on … isn’t reached yet” – wait for the switchover to finish or try to restart an instance;
Clock:
- warning: “Clock difference between … and … exceed threshold” –
limits.clock_delta_threshold_warning;
- warning: “Clock difference between … and … exceed threshold” –
Memory:
- critical: “Running out of memory on …” – when all 3 metrics
items_used_ratio,arena_used_ratio,quota_used_ratiofrombox.slab.info()exceedlimits.fragmentation_threshold_critical. You need to add more memory to the instance; - warning: “Memory is highly fragmented on …” - when
items_used_ratio > limits.fragmentation_threshold_warningand botharena_used_ratio,quota_used_ratioexceed critical limit. You can restart the instance to defragment memory or changebox.cfg.min_tuple_sizeorbox.cfg.slab_alloc_factorto reduce fragmentation;
- critical: “Running out of memory on …” – when all 3 metrics
Configuration:
- warning: “Configuration checksum mismatch on …” – config is probably corrupted somehow;
- warning: “Configuration is prepared and locked on …”;
- warning: “Advertise URI (…) differs from clusterwide config (…)”;
- warning: “Configuring roles is stuck on … and hangs for … so far”;

Cartridge can propose you to fix some of configuration issues by force applying configuration:

Vshard:
- various vshard alerts (see vshard docs for details);
- warning: “Group “…” wasn’t bootstrapped: …”. You need to bootstrap the group again;
- warning: “Vshard storages in replicaset … marked as “all writable”.
You can fix it by setting
all_rw = falsein the replicaset configuration; - warning: “Cluster has … doubled buckets. Call require(‘cartridge.vshard-utils’).find_doubled_buckets() for details”
– you need to call
require('cartridge.vshard-utils').find_doubled_buckets()to get more info and then remove all duplicated data manually and then usevshard.storage.bucket_force_drop(bucket_id)to remove the bucket. See https://github.com/tarantool/vshard/issues/412 for details. This issue is disabled by default. You can enable it by settingTARANTOOL_CHECK_DOUBLED_BUCKETS=trueand then chech will run once aTARANTOOL_CHECK_DOUBLED_BUCKETS_PERIOD(default is 24 hours);
You can enable extra vshard issues by setting
TARANTOOL_ADD_VSHARD_STORAGE_ALERTS_TO_ISSUES=true/TARANTOOL_ADD_VSHARD_ROUTER_ALERTS_TO_ISSUES=trueor with--add-vshard-storage-alerts-to-issues/--add-vshard-router-alerts-to-issuescommand-line argument. It’s recommended to enable router alerts in production.Alien members:
- warning: “Instance … with alien uuid is in the membership” –
when two separate clusters share the same cluster cookie or
when two clustes have the same first 32 symbols of cluster cookie.
You need to change the cluster cookie on one of the clusters or set
set_cookie_hash_membershipincartridge.cfgtotrue;

- warning: “Instance … with alien uuid is in the membership” –
when two separate clusters share the same cluster cookie or
when two clustes have the same first 32 symbols of cluster cookie.
You need to change the cluster cookie on one of the clusters or set
Expelled instances:
- warning: “Replicaset … has expelled instance … in box.space._cluster” - when instance was expelled from replicaset, but still remains in box.space._cluster. You need to remove it manually;
Deprecated space format:
- warning: “Instance … has spaces with deprecated format: space1, …”. You need to convert spaces to the new format;
Raft issues:
- warning: “Raft leader idle is 10.000 on … . Is raft leader alive and connection is healthy?”
Unhealthy replicasets:
- critical: “All instances are unhealthy in replicaset”.

The issue is produced when all instances in the replicaset are unhealthy and not disabled. You can disable both to get rid of the issue.

Disk failure:
- critical: “Disk error on instance …”. When you see this issue, instances will be disabled (on instances with vshard, vshard storage will also be disabled) and you need to fix the disk issue manually.
Disabled instances:
- warning: “Instance had Error and was disabled”. Available only when
TARANTOOL_DISABLE_UNRECOVERABLE_INSTANCESis set to true. When you see this issue, instances will be disabled and you need to fix the issue manually.
- warning: “Instance had Error and was disabled”. Available only when
Custom issues (defined by user):
- Custom roles can announce more issues with their own level, topic
and message. See
custom-role.get_issues.
- Custom roles can announce more issues with their own level, topic
and message. See
Disable instances suggestion:
When some instances are unhealthy, Cartridge can suggest you to disable them:

Since Tarantool Enterprise supporting compression, Cartridge can check if you have spaces where you can use compression. To enable it, click on button “Suggestions”. Note that the operation can affect cluster perfomance, so choose the time to use it wisely.

You will see the warning about cluster perfomance and then click “Continue”.

You will see information about fields that can be compressed.

You can check some general instance info in WebUI. To see it, click on “Server details button”.
And then choose one of the tabs to see various parameters:

Cartridge provides a way to control VShard rebalancer via WebUI and GraphQL API. You can operate rebalancer mode and change rebalancer settings on each replicaset or instance. It can be useful to stop rebalancer or choose rebalancer instance manually.
To change rebalancer mode, click on “Rebalancer mode” button next to “Failover” button and choose desired mode (default mode is “auto” – it’s the same as rebalancer mode in previous versions):

To change rebalancer settings on replicaset, click on “Edit replicaset” button and then choose desired rebalancer state (“unset” means abcence of the value):

To change rebalancer settings on instance, click on “…” button next to it:

And then choose desired rebalancer state (“unset” means abcence of the value):

You can see current settings and actual rebalancer state in WebUI. Black R means
that rebalancer is true on this instance/replicaset, grey R means that rebalancer
is false on this instance/replicaset, and green R means that rebalancer
is running on this instance:

See VShard documentation to get more information about rebalancer usage.
Cartridge provides a way to set zones for VShard requests. To set zones, click on “Server details” button and then choose desired zone or create a new one:

OR
set zone with Lua API or GraphQL request:
require('cartridge').admin_edit_topology({servers = {{uuid = uuid, zone = 'your_zone'}}})
Then you can add zone distances configuration. Simply create a new config file called
zone_distances.yml and add your distances:
zone1:
  zone2: 1 # distance between zone1 and zone2
  zone3: 2
zone2:
  zone3: 1
  # all missing distances are considered as 0
Now all of your balanced (vshard.router.callbro and vshard.router.callbre)
requests will be balanced between nearest zones.
Note that callbro prefers nearest (in terms of zone distances) masters, and
callbre prefers nearest replicas.
Since Cartridge 2.10.0 when using migrations 1.0.0 or higher, you can use
WebUI to monitor and control you migrations.
At first, open migrations tab in the left menu. From here, you can see all migrations status and can start migrations.

After clicking on “Migration Up” button, you will see the result:

Tarantool Enterprise supports the use of SSL connections to encrypt client-server
communications for increased security. To enable SSL in Cartridge for replication
and inner cluster communications, you can use environment variables or
cartridge.cfg options.
To enable SSL in Cartridge, set transport param to ssl in cartridge.cfg
in your init file or add environment variable TARANTOOL_TRANSPORT=ssl.
You also need to add cfg options or environment variables for the next ssl options:
ssl_ciphers, ssl_server_ca_file, ssl_server_cert_file, ssl_server_key_file,
ssl_server_password, ssl_client_ca_file, ssl_client_cert_file,
ssl_client_key_file, ssl_client_password. For details, see
this article.
To enable http encryption, use environment variables:
TARANTOOL_HTTP_SSL_CERT_FILE;TARANTOOL_HTTP_SSL_KEY_FILE;TARANTOOL_HTTP_SSL_PASSWORD;TARANTOOL_HTTP_SSL_PASSWORD_FILE;TARANTOOL_HTTP_SSL_CA_FILE;TARANTOOL_HTTP_SSL_CIPHERS.
In some cases it could be useful to change cluster-cookie (e.g. when you need to fix a broken cluster). To do it, perform next actions:
(Optional) If you use stateful failover:
-- remember old cookie hash
local cluster_cookie = require('cartridge.cluster-cookie')

local old_hash = cluster_cookie.get_cookie_hash()
Change cluster-cookie on each instance:
local cluster_cookie = require('cartridge.cluster-cookie')

cluster_cookie.set_cookie(new_cookie)

require('membership').set_encryption_key(cluster_cookie.cookie())

if require('cartridge.failover').is_leader() then
    box.schema.user.passwd(new_cookie)
end
(Optional) If you use stateful failover:
-- update cookie hash in a state provider
require('cartridge.vars').new('cartridge.failover').client:set_identification_string(
    cluster_cookie.get_cookie_hash(), old_hash)
Call
apply_configin cluster to reapply changes to each instance:local confapplier = require('cartridge.confapplier') local clusterwide_config = confapplier.get_active_config() return confapplier.apply_config(clusterwide_config)
Since Cartridge 2.11.0 you can use hash of cluster cookie instead of plian cookie as encryption key in membership.
To migrate to this feature, perform next actions:
Set new encryption key on each instance:
local cluster_cookie = require('cartridge.cluster-cookie')
local digest = require('digest')
local membership = require('membership')

membership.set_encryption_key(digest.md5_hex(cluster_cookie.cookie()))
Set param
set_cookie_hash_membershipincartridge.cfgtotruein yourinit.luafile, or use environment variables. Don’t forget to persist this setting.
Sometimes, expelled instances can remain in the membership, e. g. when they
weren’t finished correctly before being expelled. Those instances can’t
cause any harm, but they can be annoying when reading membership members list.
If you are being bothered by those instances in membership, you can remove them
with the option cartridge.cfg({exclude_expelled_members = true}) or with env
TARANTOOL_EXCLUDE_EXPELLED_MEMBERS or with command-line argument
--exclude-expelled-members.
Enabling this option will remove stopped expelled instances from the membership list.
Note that alive expelled instances and any instances that have the same
membership_encryption_key and which can ping your cluster (like newly launched
instances which are not in the topology yet) will remain in the membership list.
It’s possible that some instances have a broken configuration. To do it, perform next actions:
Try to reapply configuration forcefully:
cartridge.config_force_reapply(instaces_uuids) -- pass here uuids of broken instances
If it didn’t work, you could try to copy a config from healthy instance:
- Stop broken instance and remove it’s
configdirectory. Don’t touch any other files in working directory. - Copy
configdirectory from a healthy instance to broken one’s directory. - Start broken instance and check if it’s working.
- If nothing had worked, try to carefully remove a broken instance from cluster and setup a new one.
- Stop broken instance and remove it’s
If it isn’t possible to remove a broken instance from the cluster using WebUI or Lua API, you can try to remove it forcefully:
- Stop broken instances.
- Backup the instance’s topology config (
config/topology.yml) by copying it to another directory – it might be helpful if something goes wrong after force-reapplying. - Choose a router and memorize its URI and HTTP port.
- Go to the router’s config directory and edit the topology config file. Remove the broken instances entrys (and the replicaset entry, if you want to remove full replicaset) from the topology.
- Restart the router.
- Go to the router’s WebUI and wait until
force applysuggestion. Then push the button to reapply config (repeat if failed).
It’s possible that some instances have entered OperationError state after successfully applying a new config. You can fix broken configuration with WebUI, but if don’t have an access to it, you can try to return to the previous configuration or fix the broken one manually:
local cartridge = require('cartridge')
local config_text = require('cartridge.utils').file_read('CONFIG_PATH') -- full path to a valid config file
cartridge.config_patch_clusterwide({['config_section.yml'] = config_text}) -- use config section name here
For example, if you have a broken metrics configuration, you can try to fix it with:
local config_text = [[
export:
  - path: '/path_for_metrics'
    format: 'json'
]]
cartridge.config_patch_clusterwide({['metrics.yml'] = config_text})
When upgrading Tarantool to a newer version, please don’t forget to:
- Stop the cluster
- Make sure that
upgrade_schemaoption is enabled - Start the cluster again
This will automatically apply box.schema.upgrade() on the leader, according to the failover priority in the topology configuration.
Please see the disaster recovery section in the Tarantool manual.
Please see the backups section in the Tarantool manual.